
 Hyundai Santa Fe: Tail Gate Trim. Repair procedures
Replacement
[Tail gate trim]
|

|

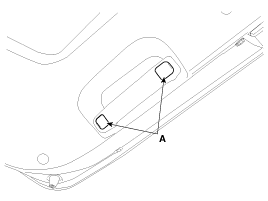
| 1. |
Remove the tail gate inside handle caps (A).
|
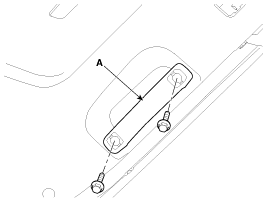
| 2. |
After loosening the mounting bolts, then remove the tail gate
inside handle (A).
|
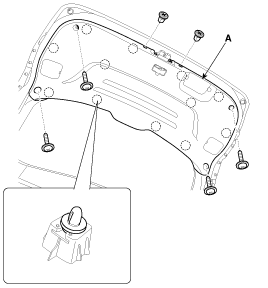
| 3. |
After loosening the mounting screws and clips, then remove the
tail gate trim (A).
|
| 4. |
Install in the reverse order of removal.
|
[Tail gate upper trim]
|
|
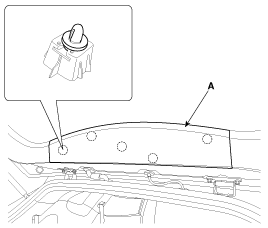
| 1. |
Using a screwdriver or remover, remove the tail gate upper trim
(A).
|
| 2. |
Install in the reverse order of removal.
|
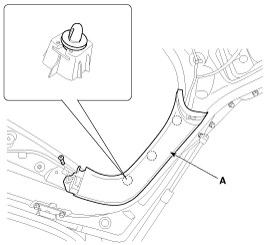
[Tail gate side trim]
|
|
| 1. |
Remove the tail gate trim.
|
| 2. |
Remove the tail gate upper trim.]
|
| 3. |
After loosening the mounting screw, then remove the tail gate
side trim (A).
|
| 4. |
Install in the reverse order of removal.
|
 Tail Gate Trim. Components and Components Location
Component Location 1. Tail gate trim ...
 Tail Gate Latch. Components and Components Location
Component Location 1. Tail gate latch assembly ...
See also:
Rear Door Belt Outside Weatherstrip. Repair procedures
Replacement 1. Pull down rear door window glass by pressing the power window glass switch. 2. After loosening the mounting screws, then remove the rear door belt outside weatherstrip (A). 3. Install in ...
Exhaust Manifold. Components and Components Location
Components 1. Heat protector 2. Exhaust manifold 3. Exhaust manifold gasket 4. Exhaust manifold stay ...
Curtain air bag
❈ The actual air bags in the vehicle may differ from the illustration. Curtain air bags are located along both sides of the roof rails above the front and rear doors. They are designed to help ...
