 Hyundai Santa Fe (TM): Child Restraint System (CRS)
Children Always in the Rear
WARNING
Always properly restrain children in the vehicle. Children of all ages are safer when restrained in the rear seat. A child riding in the front passenger seat can be forcefully struck by an inflating air bag resulting in SERIOUS INJURY or DEATH.
Children under age 13 should always ride in the rear seats and must always be properly restrained to minimize the risk of injury in an accident, sudden stop or sudden maneuver.
According to accident statistics, children are safer when properly restrained in the rear seats than in the front seat. Even with air bags, children can be seriously injured or killed. Children too large for a Child Restraint System must use the seat belts provided.
All 50 states have child restraint laws which require children to travel in approved Child Restraint Systems. The laws governing the age or height/ weight restrictions at which seat belts can be used instead of Child Restraint System differs among states, so you should be aware of the specific requirements in your country, and where you are travelling.
Child Restraint Systems must be properly placed and installed in the rear seat. You must use a commercially available Child Restraint System that meets the requirements of the Federal Motor Vehicle Safety Standards (FMVSS 213).
Child Restraint Systems are generally designed to be secured in a vehicle seat by lap belt portion of a lap/shoulder belt, or by a LATCH system in the rear seats of the vehicle.
Child Restraint System (CRS)
Infants and younger children must be restrained in an appropriate rearwardfacing or forward-facing CRS that has first been properly secured to the seat of the vehicle. Read and comply with the instructions for installation and use provided by the manufacturer of the Child Restraint System.
WARNING
An improperly secured child restraint can increase the risk of SERIOUS INJURY or DEATH in an accident. Always take the following precautions when using a Child Restraint System:
- NEVER install a child or infant restraint in the front passenger's seat.
- Always properly secure the child restraint to a rear seat of the vehicle.
- Always follow the child restraint system manufacturer's instructions for installation and use.
- Always properly restrain your child in the child restraint.
- If the vehicle head restraint prevents proper installation of a child seat (as described in the child restraint system manual), the head restraint of the respective seating position shall be readjusted or entirely removed.
- Do not use an infant carrier or a child safety seat that "hooks" over a seatback, it may not provide adequate protection in an accident.
- After an accident, have an authorized HYUNDAI dealer check the child restraint system, seat belts, tether anchors and lower anchors.
Selecting a Child Restraint System (CRS)
When selecting a Child Restraint System for your child, always:
- Make sure the Child Restraint System has a label certifying that it meets applicable Federal Motor Vehicle Safety Standards (FMVSS 213).
- Select a Child Restraint System based on your child’s height and weight. The required label or the instructions for use typically provide this information.
- Select a Child Restraint System that fits the vehicle seating position where it will be used.
- Read and comply with the warnings and instructions for installation and use provided with the Child Restraint System.
Child Restraint System types
There are three main types of Child Restraint Systems: rearward-facing, forward-facing and booster Child Restraint Systems.
They are classified according to the child’s age, height and weight.
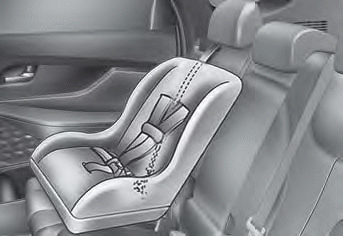
Rearward-facing Child Restraint System
A rearward-facing Child Restraint System provides restraint with the seating surface against the back of the child. The harness system holds the child in place, and in an accident, acts to keep the child positioned in the Child Restraint Systems and reduce the stress to the fragile neck and spinal cord.
All children under the age of one year must always ride in a rearward-facing Child Restraint System. Convertible and 3-in-1 Child Restraint Systems typically have higher height and weight limits for the rearward-facing position, allowing you to keep your child rearward-facing for a longer period of time.
Keep using Child Restraint Systems in the rearward-facing position as long as children fit within the height and weight limits allowed by the Child Restraint System’s manufacturer.
Continue using Child Restraint Systems in the rearward-facing position as long as children fit within the height and weight limits allowed by the Child Restraint System’s manufacturer. It's the best way to keep them safe. Once your child has outgrown the rearward-facing Child Restraint System, your child is ready for a forward-facing Child Restraint System with a harness.
WARNING
NEVER install a child or infant restraint in the front passenger's seat.
Placing a rearward-facing child restraint in the front seat can result in SERIOUS INJURY or DEATH if the child restraint is struck by an inflating air bag.
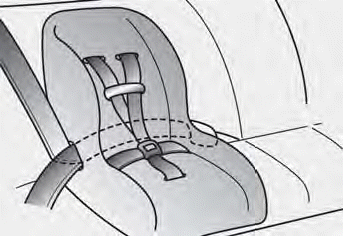
Forward-facing Child Restraint System
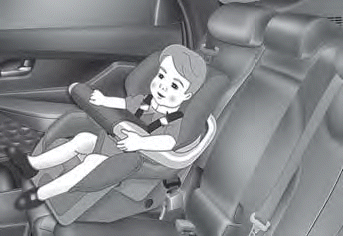
A forward-facing Child Restraint System provides restraint for the child’s body with a harness. Keep children in a forward-facing Child Restraint System with a harness until they reach the top height or weight limit allowed by your Child Restraint System’s manufacturer.
Once your child outgrows the forwardfacing Child Restraint System, your child is ready for a booster seat.
Booster seats
A booster seat is a Child Restraint System designed to improve the fit of the vehicle’s seat belt system. A booster seat positions the seat belt so that it fits properly over the stronger parts of your child’s body. Keep your children in booster seats until they are big enough to fit in a seat belt properly.
For a seat belt to fit properly, the lap belt must lie comfortable across the upper thighs, not the stomach. The shoulder belt should lie comfortable across the shoulder and chest and not across the neck or face. Children under age 13 must always be properly restrained to minimize the risk of injury in an accident, sudden stop or sudden maneuver.
Installing a Child Restraint System (CRS)
WARNING
Before installing your Child Restraint System always:
Read and follow the instructions provided by the manufacturer of the Child Restraint System.
Failure to follow all warnings and instructions could increase the risk of the SERIOUS INJURY or DEATH if an accident occurs.
WARNING
If the vehicle head restraint prevents proper installation of a Child Restraint System, the head restraint of the respective seating position shall be readjusted or entirely removed.
After selecting a proper Child Restraint System for your child and checking that the Child Restraint System fits properly on the seating position, there are three general steps for a proper installation:
- Properly secure the Child Restraint System to the vehicle. All Child Restraint Systems must be secured to the vehicle with the lap belt or lap part of a lap/shoulder part of a lap/shoulder belt or with the LATCH system.
- Make sure the Child Restraint System is firmly secured. After installing a Child Restraint System to the vehicle, push and pull the seat forward and from side-to-side to verify that it is securely attached to the seat. A Child Restraint System secured with a seat belt should be installed as firmly as possible. However, some side-to-side movement can be expected. When installing a Child Restraint System, adjust the vehicle seat and seatback (up and down, forward and rearward) so that your child fits in the Child Restraint System in a comfortable manner.
- Secure the child in the Child Restraint System. Make sure the child is properly strapped in the Child Restraint System according to the Child Restraint System manufacturer’s instructions.
CAUTION
A Child Restraint System in a closed vehicle can become very hot. To prevent burns, check the seating surface and buckles before placing your child in the Child Restraint System.
Lower Anchors and Tether for Children (LATCH System)
The LATCH system holds a Child Restraint System during driving and in an accident. This system is designed to make installation of the Child Restraint System easier and reduce the possibility of improperly installing your Child Restraint System. The LATCH system uses anchors in the vehicle and attachments on the Child Restraint System. The LATCH system eliminates the need to use seat belts to secure the Child Restraint System to the rear seats.
Lower anchors are metal bars built into the vehicle. There are two lower anchors for each LATCH seating position that will accommodate a Child Restraint System with lower attachments.
To use the LATCH system in your vehicle, you must have a Child Restraint System with LATCH attachments.
The Child Restraint System manufacturer will provide you with instructions on how to use the Child Restraint System with its attachments for the LATCH anchorages.

LATCH anchors have been provided in the left and right outboard rear seating positions. Their locations are shown in the illustration. There are not LATCH anchors provided for the center rear seating position.
WARNING
Do not attempt to install a Child Restraint System using LATCH anchors in the rear center seating position. There are no LATCH anchors provided for this seat. Using the outboard seat anchors can damage the anchors which may break or fail in a collision resulting in serious injury or death.
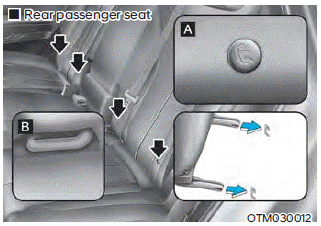
[A] : Lower Anchor Position Indicator (Type A-
 ,Type B-
 ),
),
[B] : Lower Anchor
The lower anchor position indicator symbols are located on the left and right rear seat backs to identify the position of the lower anchors in your vehicle (see arrows in illustration).
The LATCH anchors are located between the seatback and the seat cushion of the rear seat left and right outboard seating positions.
WARNING
Before installing the Child Restraint System, make sure that there are no objects (for example, toy, pen, wire) around the lower anchor area. Those objects may damage either the seat belt system or the Child Restraint System during the installment procedure. If necessary, have the vehicle inspected by an authorized HYUNDAI dealer.
Securing a Child Restraint System with the “LATCH Anchors System”
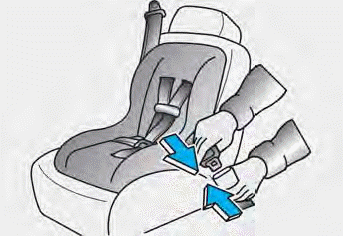
To install a LATCH-compatible Child Restraint System in either of the rear outboard seating positions:
1. Move the seat belt buckle away from the lower anchors.
2. Move any other objects away from the anchorages that could prevent a secure connection between the Child Restraint System and the lower anchors.
3. Place the Child Restraint System on the vehicle seat, then attach the seat to the lower anchors according to the instructions provided by the Child Restraint System manufacturer.
4. Follow the instructions of the Child Restraint System’s manufacturer for proper installation and connection of the lower attachments on the Child Restraint System to the lower anchors.
WARNING
Take the following precautions when using the LATCH system:
- Read and follow all installation instructions provided with your Child Restraint System.
- To prevent the child from reaching and taking hold of unretracted seat belts, buckle all unused rear seat belts and retract the seat belt webbing behind the child. Children can be strangled if a shoulder belt becomes wrapped around their neck and the seat belt tightens.
- NEVER attach more than one Child Restraint System to a single anchorage. This could cause the anchor or attachment to come loose or break.
- Always have the LATCH system inspected by your dealer after an accident. An accident can damage the LATCH system and may not properly secure the Child Restraint System.
NOTICE
The recommended weight for the LATCH system is under 65 lb. (30 kg).
How to determine an appropriate child restraint weight: Child weight + Child restraint weight < 65 lb. (30kg)
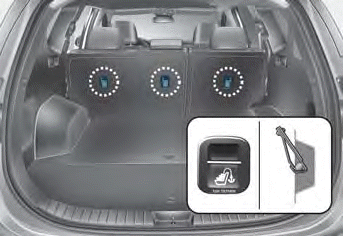
Securing a Child Restraint System seat with “Tether Anchor” system
First secure the child restraint with the LATCH lower anchors or the seat belt. If the child restraint manufacturer recommends that the top tether strap be attached, attach and tighten the top tether strap to the top tether strap anchor.
Child restraint hook holders are located on the rear of the seatbacks.
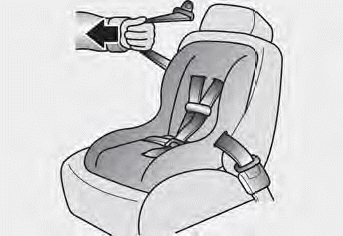
To install the tether anchor:
1. Route the Child Restraint System top-tether strap over the seatback. Route the tether strap under the head restraint and between the head restraint posts, or route the tether strap over the top of the vehicle seatback. Make sure the strap is not twisted.
2. Connect the tether strap hook to the tether anchor, then tighten the top-tether strap according to the instructions of your Child Restraint System’s manufacturer to firmly attach the Child Restraint System to the seat.
3. Check that the Child Restraint System is securely attached to the seat by pushing and pulling the seat forwardand- back and side-to-side.
WARNING
Take the following precautions when installing the top-tether:
- Read and follow all installation instructions provided with your Child Restraint System.
- NEVER attach more than one Child Restraint System to a single tether anchor. This could cause the anchorage or attachment to come loose or break.
- Do not attach the tether strap to anything other than the correct top-tether anchor. It may not work properly if attached to something else.
- Child Restraint System anchors are designed to withstand only those loads imposed by correctly fitted Child Restraint System. Do not use them for adult seat belts, harnesses, or for attaching other items or equipment to the vehicle.
Securing a Child Restraint System with a lap/shoulder belt
WARNING
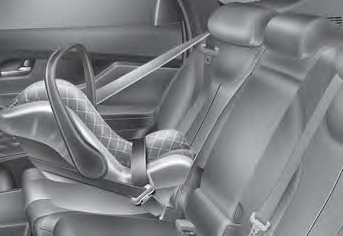
ALWAYS place a rearward-facing Child Restraint System in the rear seat of the vehicle.
Placing a rearward-facing child restraint in the front seat can result in serious injury or death if the Child Restraint System is struck by an inflating air bag.
When not using the LATCH system, all Child Restraint Systems must be secured to a rear seat with the lap part of a lap/ shoulder belt.
Automatic locking mode
Since all passenger seat belts move freely under normal conditions and only lock under extreme or emergency conditions (emergency locking mode), you must manually pull the seat belt all the way out to shift the retractor to the "Automatic Locking" mode to secure a Child Restraint System.
The "Automatic Locking" mode will help prevent the normal movement of the child in the vehicle from causing the seat belt to loosen and compromise the Child Restraint System. To secure a Child Restraint System, use the following procedure.
To install a Child Restraint System on the rear seats, do the following:
1. Place the Child Restraint System on a rear seat and route the lap/shoulder belt around or through the Child Restraint System, following the Child Restraint System manufacturer’s instructions. Make sure the seat belt webbing is not twisted.
Information
When using the rear center seat belt, you should also refer to the "Rear Seat Belt – Passenger's 3-point system" section in this chapter.
2. Fasten the lap/shoulder belt latch into the buckle. Listen for the distinct “click” sound.
Information
Position the release button so that it is easy to access in case of an emergency.
3. Pull the shoulder portion of the seat belt all the way out. When the shoulder portion of the seat belt is fully extended, it will shift the retractor to the "Automatic Locking" (child restraint) mode.

4. Slowly allow the shoulder portion of the seat belt to retract and listen for an audible "clicking" or "ratcheting" sound. This indicates that the retractor is in the "Automatic Locking" mode. If no distinct sound is heard, repeat steps 3 and 4.
5. Remove as much slack from the belt as possible by pushing down on the Child Restraint System while feeding the shoulder belt back into the retractor.
6. Push and pull on the Child Restraint System to confirm that the seat belt is holding it firmly in place. If it is not, release the seat belt and repeat steps 2 through 6.
7. Double check that the retractor is in the "Automatic Locking" mode by attempting to pull more of the seat belt out of the retractor. If you cannot, the retractor is in the "Automatic Locking" mode.
If your Child Restraint System manufacturer instructs or recommends you to use a tether anchor with the lap/ shoulder belt, refer to the previous pages for more information.
Information
When the seat belt is allowed to retract to its fully stowed position, the retractor will automatically switch from the “Automatic Locking” mode to the emergency lock mode for normal adult usage.
WARNING
If the retractor is not in the “Automatic Locking” mode, the child restraint can move when your vehicle turns or stops suddenly. A child can be seriously injured or killed if the child restraint is not properly anchored in the car, including manually pulling the seat belt all the way out to shift the retractor to the “Automatic Locking” mode.
To remove the Child Restraint System, press the release button on the buckle and then pull the lap/shoulder belt out of the Child Restraint System and allow the seat belt to retract fully.
WARNING
If a child restraint is installed in the second row center seat, move the second row seat far back as possible, to minimize contact with the front center air bag.
 Seat belts
This section describes how to use the seat belts properly. It also describes some of the things not to do when using seat belts. Seat belt safety precautions Always fasten your seat belt and make sure ...
 Air bag - supplemental restraint system
1. Driver’s front air bag 2. Passenger’s front air bag 3. Side air bag 4. Curtain air bag The vehicles are equipped with a Supplemental Air Bag System for the driver’s seat and front passenger’s ...
See also:
Rearview camera
The rearview camera will activate when the back-up light is ON with the ignition switch ON and the shift lever in the R position. This system is a supplemental system that shows behind the vehicle through ...
Components and Components Location
Components (1) 1. Parking brake pedal 2. Equalizer assembly 3. Parking brake cable Components (2) 1. Parking brake pedal assembly 2. Front parking brake cable 3. Equalizer assembly 4. Rear parking brake ...
Speakers. Repair procedures
Inspection 1. Troubleshooting for Speaker (1) Basic inspection of speaker Inspect the sound from speaker after verifying that the speaker mounting screws is removed and the wiring connector is connected ...
