 Hyundai Santa Fe (TM): Seat Belt Pretensioner
Seat Belt Pretensioner (BPT). Description and operation
| Description |
|

Seat Belt Pretensioner (BPT). Components and components location
| Components |

| 1. Front Seat
Belt Pretensioner (BPT) |
Seat Belt Pretensioner (BPT). Repair procedures
| Removal |
| 1. |
Disconnect the battery negative cable, and wait for at least three minutes
before beginning work.
|
| 2. |
Remove the front anchor seat belt (A).
|

| 3. |
Remove the center pillar lower trim.
(Refer to Body - "Center Pillar Trim")
|
| 4. |
Remove the center pillar upper trim.
(Refer to Body - "Center Pillar Trim")
|
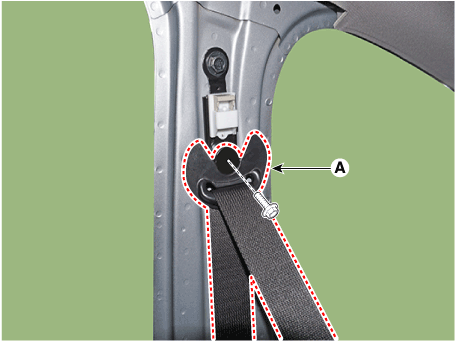
| 5. |
After loosening the mounting bolt, then remove the front seat belt lower
anchor (A).
|
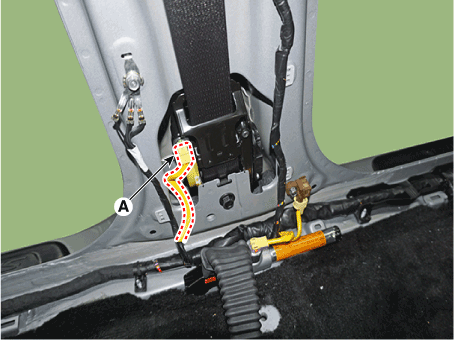
| 6. |
Disconnect the seat belt pretensioner connector (A) and then remove
the seat belt pretensioner.
|
| 7. |
Remove the seat belt pretensioner (A) after loosening the mouning bolts.
|

| Installation |
| 1. |
Disconnect the battery negative cable and wait for at least three minutes.
|
| 2. |
Install the seat belt pretensioner.
|

| 3. |
Install the front seat belt upper anchor bolt.
|
| 4. |
Install the center pillar trim.
(Refer to Body - "Center Fillar Trim")
|
| 5. |
Install the door scuff trim.
(Refer to Body - "Door Scuff Trim")
|
| 6. |
Reconnect the battery negative cable.
|
| 7. |
After installing the seat belt pretensioner, confirm proper system operation:
|
Emergency Fastening Device (EFD). Description and operation
| Description |
|
Emergency Fastening Device (EFD). Components and components location
| Components |

| 1. Emergency
Fastening Device (EFD) System |
Emergency Fastening Device (EFD). Repair procedures
| Removal |
| 1. |
Disconnect the battery negative terminal, and wait for at least three
minutes before beginning to work.
|
| 2. |
Remove the anchor seat belt (A).
|
| 3. |
Remove the front seat.
(Refer to Body - "Front Seat")
|
| 4. |
Remove the door scuff trim trim.
(Refer to Body - "Door Scuff Trim")
|
| 5. |
Remove the center pillar lower trim.
(Refer to Body - "Center Pillar Trim")
|
| 6. |
Disconnect the connector (A) and then remove the anchor pretensioner
by loosening the mounting bolt.
|

| Installation |
| 1. |
Install anchor pretensioner and reconnect the connector (A).
|
| 2. |
Remove the front seat.
(Refer to Body - "Front Seat")
|
| 3. |
Install the center pillar lower trim.
(Refer to Body - "Center Pillar Trim")
|
| 4. |
Install the door scuff trim trim.
(Refer to Body - "Door Scuff Trim")
|
| 5. |
Reconnect the battery negative cable.
After installing the anchor pretensioner, confirm proper system operation:
|
 Airbag Module
Driver Airbag (DAB) Module and Clock Spring. Description and operation Description The Driver Airbag (DAB) is installed in the steering wheel and electrically connected to SRSCM via the clock spring. It ...
 Brake System
...
See also:
Luggage tray
Rear You can place a first aid kit, a reflector triangle, tools, etc. in the box for easy access. Rear • Grasp the handle on the top of the cover and lift it. Front Front 1. Grasp the handle on the ...
Camshaft Position Sensor (CMPS). Description and Operation
Description Camshaft Position Sensor (CMPS) is a hall sensor and detects the camshaft position by using a hall element. It is related with Crankshaft Position Sensor (CKPS) and detects the piston position ...
Parking Brake Assembly. Repair procedures
Removal Parking Brake Shoe 1. Raise the vehicle, and make sure it is securely supported. 2. Remove the rear tire and wheel. 3. Remove the rear brake caliper and Rear disc brake. 4. Remove the parking brake ...
