Hyundai Santa Fe: Shift Cable. Repair procedures - Automatic Transaxle Control System - Automatic Transaxle SystemHyundai Santa Fe: Shift Cable. Repair procedures

Removal

1.
Remove the floor console.
2.
Remove the air duct.
3.
Disconnect the shift cable (A).
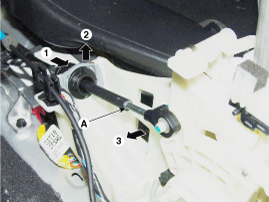
4.
Remove the retainer (A) and nut (B).

Tightening torque :
7.8 ~ 11.8 N.m (0.8 ~ 1.2 kgf.m, 5.8~8.7 lb-ft)

5.
Remove the nut (C) from the manual control lever.
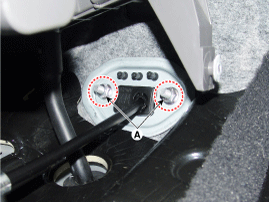
Tightening torque:
7.8~11.8 N.m(0.8~1.2 kgf.m, 5.8~8.7 lb-ft)

6.
Remove the cable (B) from the bracket (A) at transaxle assembly side.
7.
Remove the shift cable by pulling it toward the interior.


Installation

1.
Install in the reverse order of removal.
Set shift lever and inhibitor switch manual control lever to "N" position.

Adjustment

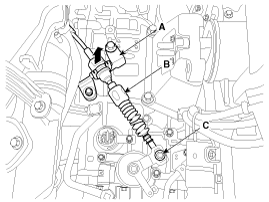
Adjusting method for T/M control cable
1.
Set room side shift lever and T/M side manual control lever to "N" position.
2.
Connect room side shift lever and shift cable.
3.
Push cable to "F" direction shown to eliminate FREE PLAY.
4.
Tighten adjusting nut (A).
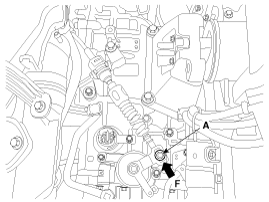
Tightening torque :
7.8 ~ 11.8 N.m (0.8 ~ 1.2 kgf.m, 5.8~8.7 lb-ft)

5.
After adjusting according check to be sure that this part operates surely at each range of T/M side corresponding to each position of shift lever.

Shift Cable. Components and Components Location
Components 1. Console upper cover 2. Shift lever assembly 3. Shift cable assembly 4. Shift lever knob & boots assembly 5. Manual control lever 6. Retainer ...

See also:

Washer fluid
Checking the washer fluid level The reservoir is translucent so that you can check the level with a quick visual inspection. Check the fluid level in the washer fluid reservoir and add fluid if necessary. ...

Hood Insulator Pad. Repair procedures
Replacement 1. Using a clip remover, detach the clips, and remove the hood insulator pad (A). • Be careful not to scratch the hood panel. 2. Install in the reverse order of removal. • Replace any damaged ...

Rear Bumper beam Assembly. Repair procedures
Replacement • Put on gloves to protect your hands. • When prying with a flat-tip screwdriver, wrap it with protective tape, and apply protective tape around the related parts, to prevent damage. • ...