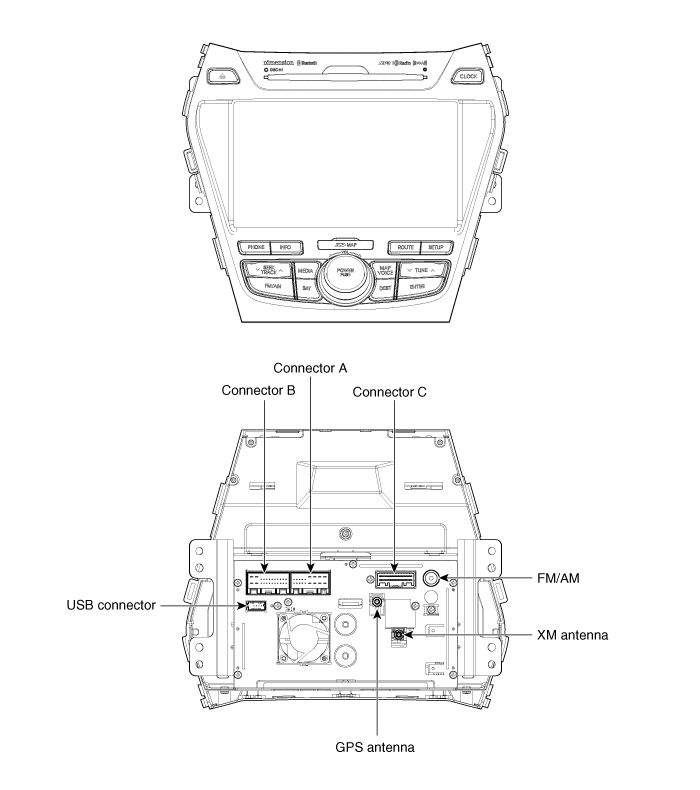
 Hyundai Santa Fe: AVN Head Unit. Components and Components
Location
Components

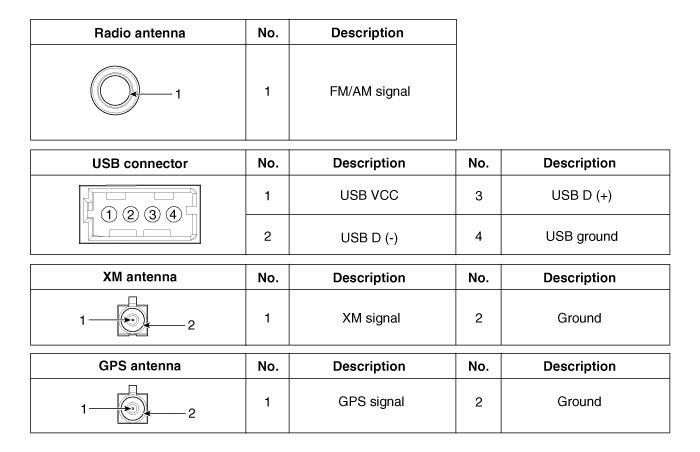
| AVN (A/V & Navigation) Head Unit Connector |

Connector Pin Information
|
No. |
Connector A |
Connector B |
Connector C |
|
1 |
- |
MM CAN High |
- |
|
2 |
Parking V VIDEO |
- (Dimming output) |
- |
|
3 |
Parking V GND |
Parking |
- |
|
4 |
Rear camera shield ground |
Steering wheel remocon |
MTS/TMU ground |
|
5 |
SPDIF ground |
- (Rear remocon) |
RS422 Tx + |
|
6 |
SPDIF (+) |
IGN |
RS422 Tx - |
|
7 |
ALT L |
AUX VIDEO |
RS422 Rx - |
|
8 |
Illumination (+) |
AUX right input |
RS422 Rx + |
|
9 |
R position |
AUX ground |
- (LVDS PDN) |
|
10 |
- |
MIC (+) |
- |
|
11 |
Rear camera power |
ACC (+) |
- |
|
12 |
Navigation voice (-) |
Battery (+) |
Ground |
|
13 |
Navigation voice (+) |
MM CAN Low |
- (LVDS LOCK) |
|
14 |
PGS/ Rear camera |
Auto light |
- (BL ON) |
|
15 |
SPDIF (-) |
P position |
- (TOUCH Rx +) |
|
16 |
Door key unlock |
Vehicle speed |
- (TOUCH Rx -) |
|
17 |
Illumination (-) |
Remocon ground |
Ground |
|
18 |
Antenna remocon power |
- |
- (TOUCH Tx -) |
|
19 |
|
AUX VIDEO ground |
- (TOUCH Tx +) |
|
20 |
AUX detect |
MTS/TMU voice (+) |
|
|
21 |
AUX left input |
MTS/TMU voice (-) |
|
|
22 |
MIC (-) |
- |
|
|
23 |
Power ground |
Ground |
|
|
24 |
Power ground |
- |

 Description and Operation
Description Limitations Of The Navigation system GPS Signal Reception State As the GPS satellite frequency is received/transmitted in straight lines, reception may not work if hiding devices are placed ...
 AVN Head Unit. Repair procedures
Removal • Take care not to scratch the center fascia panel and related parts. • Eject all the disc before removing the AVN head unit to prevent damaging the CD player's load mechanism. 1. Disconnect ...
See also:
Charging System Warning Light
This warning light illuminates: Once you set the ignition switch or Engine Start/Stop Button to the ON position. - It remains on until the engine is started. When there is a malfunction with either the ...
To turn cruise control off, do one of the following
Press the CRUISE button (the CRUISE indicator light in the instrument cluster will go off). Turn the ignition off. Both of these actions cancel cruise control operation. If you want to resume cruise control ...
Crach Pad Center Panel. Components and Components Location
Component Location 1. Crash pad center lower panel ...
