Replacement
[Second row seat assembly]
| •
|
Put on gloves to protect your hands.
|
|
| •
|
When prying with a flat-tip screwdriver, wrap it with
protective tape, and apply protective tape around the related
parts, to prevent damage.
|
| •
|
Use a plastic panel removal tool to remove interior trim
pieces to protect from marring the surface.
|
| •
|
Take care not to bend or scratch the trim and panels.
|
|
|
1. |
Remove the rear seat back cover.
|
|
2. |
Remove the rear seat cushion cover.
|
|
3. |
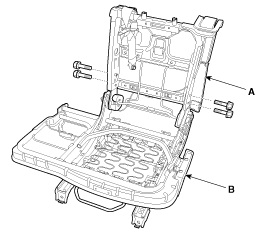
After loosening the mounting bolts, then disconnect the rear seat
back frame assembly (A) and rear seat cushion frame assembly (B).
Tightening torque :
44.1 ~ 53.9 N.m (4.5 ~ 5.5 kgf.m, 32.5 ~ 39.8 lb-ft)
|

|
|
4. |
Install in the reverse order of removal.
|
• |
Replace any damaged clips.
|
|
|
| •
|
Put on gloves to protect your hands.
|
|
| •
|
When prying with a flat-tip screwdriver, wrap it with
protective tape, and apply protective tape around the related
parts, to prevent damage.
|
| •
|
Use a plastic panel removal tool to remove interior trim
pieces to protect from marring the surface.
|
| •
|
Take care not to bend or scratch the trim and panels.
|
|
|
1. |
Remove the rear seat back cover.
|
|
2. |
Remove the rear seat cushion cover.
|
|
3. |
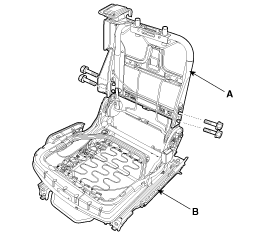
After loosening the mounting bolts, then disconnect the rear seat
back frame assembly (A) and rear seat cushion frame assembly (B).
Tightening torque :
44.1 ~ 53.9 N.m (4.5 ~ 5.5 kgf.m, 32.5 ~ 39.8 lb-ft)
|

|
|
4. |
Install in the reverse order of removal.
|
• |
Replace any damaged clips.
|
|
|
[Third row seat assembly]
| •
|
Put on gloves to protect your hands.
|
|
| •
|
When prying with a flat-tip screwdriver, wrap it with
protective tape, and apply protective tape around the related
parts, to prevent damage.
|
| •
|
Use a plastic panel removal tool to remove interior trim
pieces to protect from marring the surface.
|
| •
|
Take care not to bend or scratch the trim and panels.
|
|
|
1. |
Remove the rear seat back cover.
|
|
2. |
Remove the rear seat cushion cover.
|
|
3. |
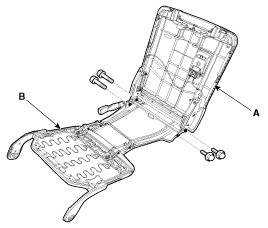
After loosening the mounting bolts, then disconnect the rear seat
back frame assembly (A) and rear seat cushion frame assembly (B).
Tightening torque :
44.1 ~ 53.9 N.m (4.5 ~ 5.5 kgf.m, 32.5 ~ 39.8 lb-ft)
|

|
|
4. |
Install in the reverse order of removal.
|
• |
Replace any damaged clips.
|
|
|
Component Location [Second row seat assembly] (LH) 1. Rear seat back frame assembly 2. Rear seat cushion frame assembly (RH) 1. Rear seat back frame assembly 2. Rear seat cushion frame assembly [Third ...
See also:
Audio Remote Control. Repair procedures
Inspection 1. Check for resistance between terminals in each switch position. [Audio] Switch Connector terminal Resistance (± 5%) SEEK up 2-7 430 Ω SEEK down 2-7 1.11 kΩ Mode 2-7 2.11 kΩ ...
For best battery service
Keep the battery securely mounted. Keep the battery top clean and dry. Keep the terminals and connections clean, tight, and coated with petroleum jelly or terminal grease. Rinse any spilled electrolyte ...
All Wheel Drive (AWD) LOCK Indicator Light
This indicator light illuminates: Once you set the ignition switch or Engine Start/Stop Button to the ON position. - It illuminates for approximately 3 seconds and then goes off. When you select AWD Lock ...
 Hyundai Santa Fe (DM): Rear Seat Frame Assembly. Repair procedures
 Rear Seat Frame Assembly. Components and Components Location
 Front Seat Belt


