 Hyundai Santa Fe: Battery Sensor. Repair procedures
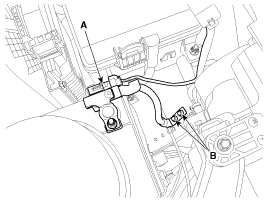
Removal
| 1. |
Disconnect the battery negative (-) cable.
|
| 2. |
Disconnect the battery sensor connector (A).
|
| 3. |
Remove the battery negative (-) cable after removing the bolts
(B).
ąĪą▓ąĄąČą░čÅ ąĖąĮč乊čĆą╝ą░čåąĖčÅ ą┐čĆąŠą│čĆą░ą╝ą╝čŗ ą┤ą╗čÅ čāą┐čĆą░ą▓ą╗ąĄąĮąĖčÅ ą┤ąĄą▒ąĖč鹊čĆčüą║ąŠą╣ ąĘą░ą┤ąŠą╗ąČąĄąĮąĮąŠčüčéčīčÄ čā ąĮą░čü ąĮą░ čüą░ą╣č鹥.
|
Installation
| 1. |
Install in the reverse order of removal.
|
 Battery Sensor. Description and Operation
Description Vehicles have many control units that use more electricity. These units control their own system based on information from diverse sensors. It is important to have a stable power supply as ...
 Starting System
...
See also:
Purge Control Solenoid Valve (PCSV). Description and Operation
Description Purge Control Solenoid Valve (PCSV) is installed on the surge tank and controls the passage between the canister and the intake manifold. It is a solenoid valve and is open when the ECM grounds ...
Repair procedures
Inspection Check it by the procedure below to see if the function of the ECM is normal. 1. Turn the ignition key to the "ON" position. 2. Cover the forward facing sensor. 3. Head a light to the ...
Heated Schematic Diagrams
System Circuit Diagram Terminal Function Housing Pin Function Wire color Pad A GND Back B HEATER Yellow C NTC+ Back / Yellow D NTC- Back Remote control A GND Back B BAT Red C LED Green D SWITCH White ...
