 Hyundai Santa Fe: Passive Occupant Detection System (PODS-F). Repair procedures
Removal
| 1. |
Disconnect the battery negative cable, and wait for at least three
minutes before beginning work.
|
| 2. |
Remove the front passenger seat assembly.
|
| 3. |
Disconnect the PODS-F ODU connector.
|
| 4. |
Remove the PODS-F ODU.
|
| 1. |
Disconnect the battery negative cable, and wait for at least three
minutes before beginning work.
|
| 2. |
Remove the front passenger seat assembly.
|
| 3. |
Disconnect the PODS-F mat connector.
|
| 4. |
Remove the front seat cushion assembly
|
ąÜąŠą╝ą┐čĆąĄčüčüąŠčĆ ą▓ąŠąĘą┤čāčłąĮčŗą╣ ą╝ąĄą╝ą▒čĆą░ąĮąĮčŗą╣: ą║čāą┐ąĖčéčī ą╝ąĄą╝ą▒čĆą░ąĮąĮčŗąĖ ą║ąŠą╝ą┐čĆąĄčüčüąŠčĆ www.vac-industry.ru.
Installation
| 1. |
Install the PODS-F ODU on the Front seat track assembly.
|
| 2. |
Connect the PODS-F ODU connector.
|
| 3. |
Install the front passenger seat assembly.
|
| 4. |
Reconnect the battery negative cable.
|
| 5. |
After installing the PODS-F, confirm proper system operation :
|
| 1. |
Install the PODS-F Mat equipped seat cushion assembly on the front
seat assembly.
|
| 2. |
Connect the PODS-F mat connector.
|
| 3. |
Install the front passenger seat assembly.
|
| 4. |
Reconnect the battery negative cable.
|
| 5. |
After installing the PODS-F, confirm proper system operation :
|
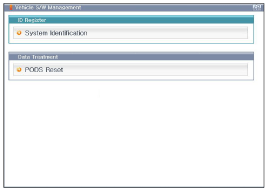
PODS-F zeroing Procedure
| - |
Seat assembly, Seat foam and Seat Cushion Assembly Replacement
(PODS-F ODU No Replacement): C1[Auto]
|
| - |
PODS-F ODU Replacement: C2[Manual]:
|
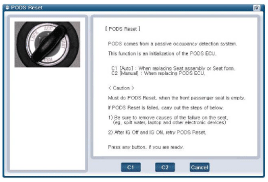
| 1. |
Ignition ŌĆ£OFFŌĆØ, connect GDS.
|
| 2. |
Ignition ŌĆ£ONŌĆØ & Engine ŌĆ£OFFŌĆØ, select Airbag system and ŌĆ£PODS-F
ResetŌĆØ mode.
|
| 3. |
Select C1.
C1[Auto] : When replacing seat assembly or Seat foam.
|
| 4. |
The GDS will show the two PODS-F Zeroing function steps.
|
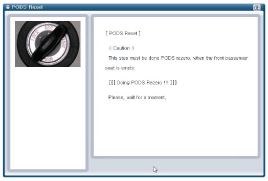
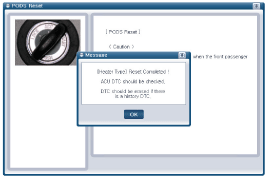
| 5. |
The PODS-F initialization procedure will be performed.
[Heater type]
[No heater type]
[Vent heater type]
|

| 1. |
Ignition ŌĆ£OFFŌĆØ, connect GDS.
|
| 2. |
Ignition ŌĆ£ONŌĆØ & Engine ŌĆ£OFFŌĆØ, select Airbag system and ŌĆ£PODS-F
ResetŌĆØ mode.
|
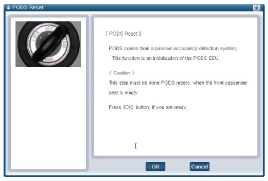
| 3. |
Select C2.
C2[Manual]: When replacing PODS-F ODU
|
| 4. |
Select seat type.
|
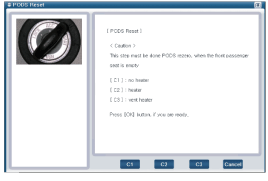
| 5. |
The GDS will show the two PODS-F Zeroing function steps.
|
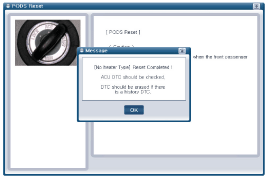
| 6. |
The PODS-F initialization procedure will be performed.
[Heater type]
[No heater type]
[Vent heater type]
|

 Schematic Diagrams
Circuit Diagram (1) Circuit Diagram (2) Circuit Diagram (3) SRSCM Connector terminal Pin Function (Connector A) Pin Function (Connector B) 1 Ignition 1 Seat belt pretensioner [Driver] High 2 Passenger ...
See also:
Troubleshooting
Trouble Symptom Charts Trouble Symptom 1 Trouble Symptom 2 Trouble symptom Probable cause Remedy The set vehicle speed varies greatly upward or downward "Surging" (repeated alternating acceleration ...
Components and Components Location
Components (1) 1. Parking brake pedal 2. Equalizer assembly 3. Parking brake cable Components (2) 1. Parking brake pedal assembly 2. Front parking brake cable 3. Equalizer assembly 4. Rear parking brake ...
Rear window wiper and washer switch
The rear window wiper and washer switch is located at the end of the wiper and washer switch lever. Turn the switch to the desired position to operate the rear wiper and washer. HI : High wiper speed ...
