 Hyundai Santa Fe: Schematic Diagrams
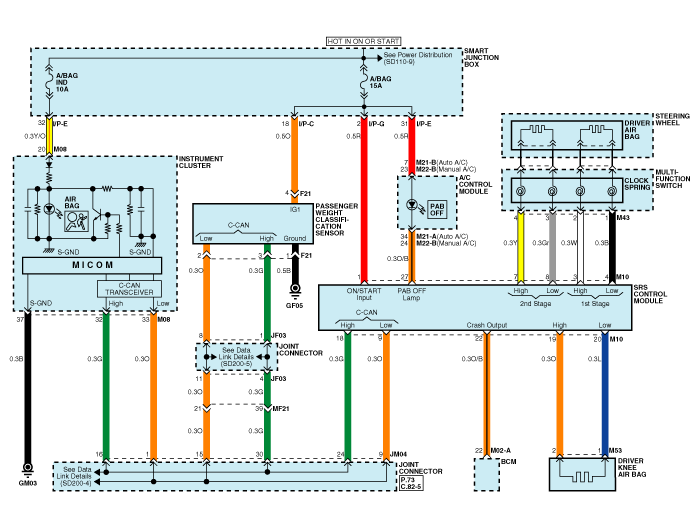
Circuit Diagram (1)
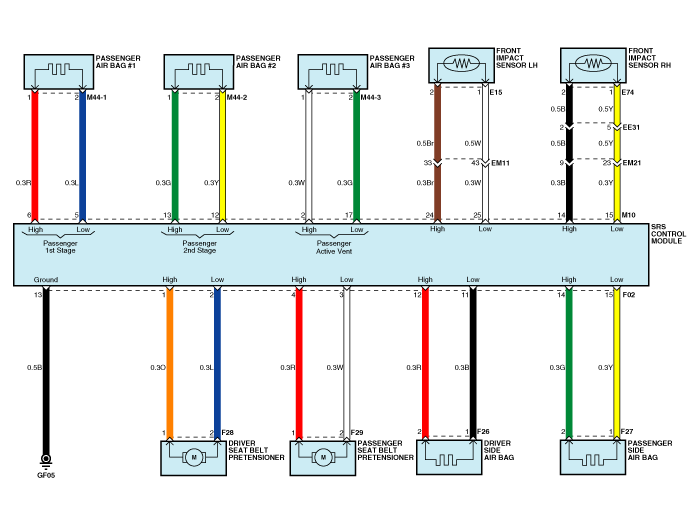
Circuit Diagram (2)
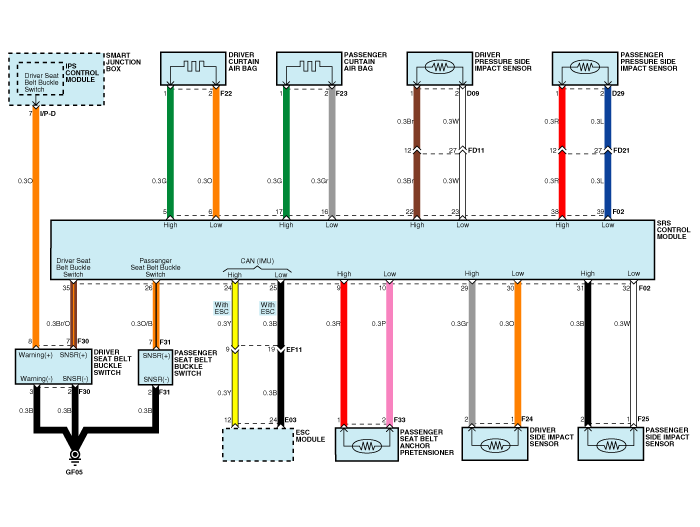
Circuit Diagram (3)
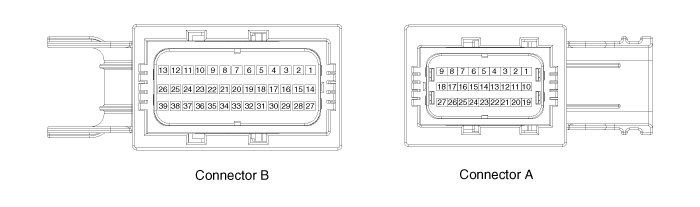
SRSCM Connector terminal
|
Pin |
Function (Connector A) |
Pin |
Function (Connector B) |
|
1 |
Ignition |
1 |
Seat belt pretensioner [Driver] High |
|
2 |
Passenger airbag Active vent High |
2 |
Seat belt pretensioner [Driver] Low |
|
3 |
(1st stage) Driver airbag High |
3 |
Seat belt pretensioner [Passenger] Low |
|
4 |
(1st stage) Driver airbag Low |
4 |
Seat belt pretensioner [Passenger] High |
|
5 |
(1st stage) Passenger airbag Low |
5 |
Curtain Airbag [Driver] High |
|
6 |
(1st stage) Passenger airbag High |
6 |
Curtain Airbag [Driver] Low |
|
7 |
(2st stage) Driver airbag High |
7 |
- |
|
8 |
(2st stage) Driver airbag Low |
8 |
- |
|
9 |
CAN_Low |
9 |
Emergency fastening device [Passenger] High |
|
10 |
Shorting bar |
10 |
Emergency fastening device [Passenger] Low |
|
11 |
Shorting bar |
11 |
Side airbag [Driver] Low |
|
12 |
(2st stage) Passenger airbag Low |
12 |
Side airbag [Driver] High |
|
13 |
(2st stage) Passenger airbag High |
13 |
Ground |
|
14 |
Front impact sensor [Passenger] High |
14 |
Side airbag [Passenger] High |
|
15 |
Front impact sensor [Passenger] Low |
15 |
Side airbag [Passenger] Low |
|
16 |
- |
16 |
Curtain Airbag [Passenger] Low |
|
17 |
Passenger airbag Active vent Low |
17 |
Curtain Airbag [Passenger] High |
|
18 |
CAN_High |
18 |
- |
|
19 |
Knee airbage High |
19 |
- |
|
20 |
Knee airbage Low |
20 |
- |
|
21 |
- |
21 |
- |
|
22 |
Crash Output |
22 |
Pressure side impact sensor [Passenger] High |
|
23 |
- |
23 |
Pressure side impact sensor [Passenger] Low |
|
24 |
Front impact sensor [Driver] High |
24 |
C_CAN High (IMU LINE) |
|
25 |
Front impact sensor [Driver] Low |
25 |
C_CAN Low (IMU LINE) |
|
26 |
- |
26 |
Seat belt buckle switch [Passenger] |
|
27 |
Telltale Lamp |
27 |
- |
|
|
|
28 |
- |
|
|
|
29 |
Side impact sensor [Driver] High |
|
|
|
30 |
Side impact sensor [Driver] Low |
|
|
|
31 |
Side impact sensor [Passenger] High |
|
|
|
32 |
Side impact sensor [Passenger] Low |
|
|
|
33 |
- |
|
|
|
34 |
- |
|
|
|
35 |
Seat belt buckle switch [Driver] |
|
|
|
36 |
- |
|
|
|
37 |
- |
|
|
|
38 |
Pressure side impact sensor [Driver] High |
|
|
|
39 |
Pressure side impact sensor [Driver] Low |
 Passive Occupant Detection System (PODS-F). Repair procedures
Removal PODS-F ODU (Occupant Detection Unit) 1. Disconnect the battery negative cable, and wait for at least three minutes before beginning work. 2. Remove the front passenger seat assembly. 3. Disconnect ...
 Airbag Module
...
See also:
Smart Key Unit. Schematic Diagrams
Circuit Diagram ...
Immobilizer Control Unit. Repair
procedures
Removal 1. Disconnect the negative (-) battery terminal. 2. Remove the driver crash pad lower panel. 3. Remove the knee airbag module. 4. Disconnect the connector of the immobilizer unit and then remove ...
Steering Angle Sensor. Description and Operation
Description The Steering Angle Sensor (SAS) is installed in MDPS (Motor Driven Power Steering) and it sends messages to HECU through CAN communication line. The SAS is used to determine turning direction ...
