
 Hyundai Santa Fe: Rear Mud Guard. Repair procedures
Replacement
|

|

| 1. |
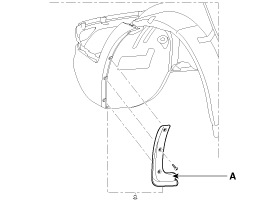
After loosening the mounting clip and screws, then remove the
rear mud guard (A).
|
| 2. |
Install in the reverse order of removal.
|
 Front Mud Guard. Repair procedures
Replacement • Put on gloves to protect your hands. • When prying with a flat-tip screwdriver, wrap it with protective tape, and apply protective tape around the related parts, to prevent damage. • ...
 Side Sill Molding. Repair procedures
Replacement • Put on gloves to protect your hands. • When prying with a flat-tip screwdriver, wrap it with protective tape, and apply protective tape around the related parts, to prevent damage. • ...
See also:
Seat belts - Front passenger and rear seat 3-point system with combination locking
retractor
To fasten your seat belt: Combination retractor type seat belts are installed in the rear seat positions to help accommodate the installation of child restraint systems. Although a combination retractor ...
Front Stabilizer Bar. Repair procedures
Removal 1. Remove the front wheel and tire (A) from front hub . Tightening torque: 88.2 ~ 107.8 N.m (9.0 ~ 11.0 kgf.m, 65.0 ~ 79.5 lb-ft) Be careful not to damage to the hub bolts when removing the front ...
Fluid. Components and Components Location
Component Location 1. ATF Injection hole(eyebolt) 2. Oil level plug 3. Oil drain plug ...
