 Hyundai Santa Fe: Transaxle Control Module (TCM). Schematic Diagrams
1. TCM connector and terminal function
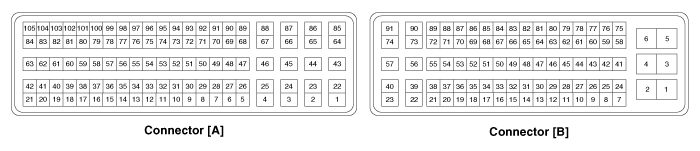
2. TCM Terminal Function
Connector [A]
|
Pin |
Description |
Pin |
Description |
|
1 |
ㅡ |
54 |
ㅡ |
|
2 |
Line pressure control solenoid valve (LINE_VFS) |
55 |
ㅡ |
|
3 |
Torque converter control solenoid valve (T/CON_VFS) |
56 |
ㅡ |
|
4 |
35R clutch control solenoid valve (35R/C_VFS) |
57 |
ㅡ |
|
5 |
ㅡ |
58 |
ㅡ |
|
6 |
ㅡ |
59 |
ㅡ |
|
7 |
Inhibitor switch signal "S1" |
60 |
ㅡ |
|
8 |
Inhibitor switch signal "S2" |
61 |
ㅡ |
|
9 |
Inhibitor switch signal "S3" |
62 |
ㅡ |
|
10 |
Inhibitor switch signal "S4" |
63 |
ㅡ |
|
11 |
ㅡ |
64 |
ㅡ |
|
12 |
ㅡ |
65 |
SS-B Solenoid valve (ON/OFF) |
|
13 |
ㅡ |
66 |
SS-A Solenoid valve (ON/OFF) |
|
14 |
ㅡ |
67 |
Battery (B+) |
|
15 |
ㅡ |
68 |
ㅡ |
|
16 |
ㅡ |
69 |
Oil temperature sensor (+) |
|
17 |
ㅡ |
70 |
ㅡ |
|
18 |
ㅡ |
71 |
ㅡ |
|
19 |
ㅡ |
72 |
ㅡ |
|
20 |
ㅡ |
73 |
Output speed sensor signal |
|
21 |
ㅡ |
74 |
Sports mode up switch |
|
22 |
ㅡ |
75 |
ㅡ |
|
23 |
Underdrive brake control solenoid valve (UD/B_VFS) |
76 |
ㅡ |
|
24 |
26 Brake control solenoid valve (26/B_VFS) |
77 |
ㅡ |
|
25 |
Overdrive clutch control solenoid valve (OD/C_VFS) |
78 |
ㅡ |
|
26 |
ㅡ |
79 |
ㅡ |
|
27 |
ㅡ |
80 |
ㅡ |
|
28 |
ㅡ |
81 |
ㅡ |
|
29 |
ㅡ |
82 |
ㅡ |
|
30 |
ㅡ |
83 |
ㅡ |
|
31 |
ㅡ |
84 |
ㅡ |
|
32 |
ㅡ |
85 |
ㅡ |
|
33 |
ㅡ |
86 |
Solenoid supply power 1 |
|
34 |
ㅡ |
87 |
Solenoid supply power 2 |
|
35 |
ㅡ |
88 |
Battery (B+) |
|
36 |
ㅡ |
89 |
ㅡ |
|
37 |
ㅡ |
90 |
Output speed sensor power |
|
38 |
ㅡ |
91 |
Input speed sensor power |
|
39 |
ㅡ |
92 |
ㅡ |
|
40 |
ㅡ |
93 |
ㅡ |
|
41 |
ㅡ |
94 |
Input speed sensor signal |
|
42 |
ㅡ |
95 |
Sports mode down switch |
|
43 |
ㅡ |
96 |
ㅡ |
|
44 |
Ground (Power 1) |
97 |
ㅡ |
|
45 |
Ground (Power 2) |
98 |
ㅡ |
|
46 |
Shift lock solenoid |
99 |
ㅡ |
|
47 |
ㅡ |
100 |
ㅡ |
|
48 |
Oil temperature sensor (-) |
101 |
ㅡ |
|
49 |
ㅡ |
102 |
ㅡ |
|
50 |
ㅡ |
103 |
ㅡ |
|
51 |
ㅡ |
104 |
ㅡ |
|
52 |
Sports mode select switch |
105 |
ㅡ |
|
53 |
ㅡ |
|
|
For reliable info about transmission nodes, check out the manual, dude.
3. TCM Terminal Input/ Output Signal
Connector [A]
|
Pin |
Description |
Condition |
Input/output value |
|
|
Type |
Level |
|||
|
1 |
- |
|
|
|
|
2 |
Line pressure control solenoid valve |
|
Output |
0V/Battery voltage level |
|
(LINE_VFS) |
9V < Battery voltage level < 16V |
|||
|
3 |
Torque converter control solenoid valve |
|
Output |
0V/Battery voltage level |
|
(T/CON_VFS) |
9V < Battery voltage level < 16V |
|||
|
4 |
35R clutch control solenoid valve |
|
Output |
0V/Battery voltage level |
|
(35R/C_VFS) |
9V < Battery voltage level < 16V |
|||
|
5 |
- |
|
|
|
|
6 |
- |
|
|
|
|
7 |
Inhibitor switch signal "S1" |
High |
Input |
0V/Battery voltage level |
|
Low |
9V < Battery voltage level < 16V |
|||
|
8 |
Inhibitor switch signal "S2" |
High |
Input |
0V/Battery voltage level |
|
Low |
9V < Battery voltage level < 16V |
|||
|
9 |
Inhibitor switch signal "S3" |
High |
Input |
0V/Battery voltage level |
|
Low |
9V < Battery voltage level < 16V |
|||
|
10 |
Inhibitor switch signal "S4" |
High |
Input |
0V/Battery voltage level |
|
Low |
9V < Battery voltage level < 16V |
|||
|
11 |
- |
|
|
|
|
12 |
- |
|
|
|
|
13 |
- |
|
|
|
|
14 |
- |
|
|
|
|
15 |
- |
|
|
|
|
16 |
- |
|
|
|
|
17 |
- |
|
|
|
|
18 |
- |
|
|
|
|
19 |
- |
|
|
|
|
20 |
- |
|
|
|
|
21 |
- |
|
|
|
|
22 |
- |
|
|
|
|
23 |
Underdrive brake control solenoid valve |
|
Output |
0V/Battery voltage level |
|
(UD/B_VFS) |
9V < Battery voltage level < 16V |
|||
|
|
Power supply : V_SOL2 |
|||
|
24 |
26 Brake control solenoid valve |
|
Output |
0V/Battery voltage level |
|
(26/B_VFS) |
9V < Battery voltage level < 16V |
|||
|
|
Power supply : V_SOL2 |
|||
|
25 |
Overdrive clutch control solenoid valve |
|
Output |
0V/Battery voltage level |
|
(OD/C_VFS) |
9V < Battery voltage level < 16V |
|||
|
|
Power supply : V_SOL1 |
|||
|
26 |
- |
|
|
|
|
27 |
- |
|
|
|
|
28 |
- |
|
|
|
|
29 |
- |
|
|
|
|
30 |
- |
|
|
|
|
31 |
- |
|
|
|
|
32 |
- |
|
|
|
|
33 |
- |
|
|
|
|
34 |
- |
|
|
|
|
35 |
- |
|
|
|
|
36 |
- |
|
|
|
 Transaxle Control Module (TCM). Description and Operation
Description Transaxle Control Module (TCM) is the automatic transaxle's brain. The module receives and processes signals from various sensors and implements a wide range of transaxle controls to ensure ...
 Transaxle Control Module (TCM). Repair procedures
Removal When replacing the TCM, the vehicle equipped with the immobilizer must be performed procedure as below. [In the case of installing used TCM] 1. Perform "TCM Neutral mode" procedure with ...
See also:
Fluid. Components and Components Location
Component Location 1. ATF Injection hole(eyebolt) 2. Oil level plug 3. Oil drain plug ...
Components and Components Location
Components Location 1. PCV Valve 2. Canister 3. Purge Control Solenoid Valve (PCSV) 4. Fuel Tank Pressure Sensor (FTPS) 5. Canister Close Valve (CCV) 6. Fuel Level Sender (FLS) 7. Fuel Tank Air Filter ...
Specifications
Specifications Fuel Delivery System Items Specification Fuel Tank Capacity 66 lit. (17.4 U.S.gal., 69.7 U.S.qt., 58.0 Imp.qt.) Fuel Filter Type Paper type Fuel Pressure Low Pressure Fuel Line 480 ~ 520 ...
