 Hyundai Santa Fe: Crankshaft Position Sensor (CKPS). Repair procedures
Inspection
| 1. |
Check the signal waveform of the CMPS and CKPS using the GDS.
|
Removal
| 1. |
Turn the ignition switch OFF and disconnect the battery negative
(-) cable.
|
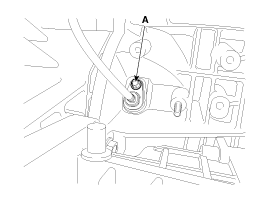
| 2. |
Disconnect the crankshaft position sensor connector (A).
|

| 3. |
Remove the protector (A).
|

| 4. |
Remove the installation bolt (A), and then remove the crankshaft
position sensor.
|
Installation
|
|
|
| 1. |
Install in the reverse order of removal.
|
 Crankshaft Position Sensor (CKPS). Schematic Diagrams
Circuit Diagram ...
 Camshaft Position Sensor (CMPS). Description and Operation
Description Camshaft Position Sensor (CMPS) is a hall sensor and detects the camshaft position by using a hall element. It is related with Crankshaft Position Sensor (CKPS) and detects the piston position ...
See also:
Side Impact Sensor (SIS). Components and Components Location
Components ...
Transmitter precautions
✽ NOTICE The transmitter will not work if any of following occur: The ignition key is in the ignition switch. You exceed the operating distance limit (about 90 feet [30 m]). The battery in the transmitter ...
Before entering vehicle
Be sure that all windows, outside mirror(s), and outside lights are clean. Check the condition of the tires. Check under the vehicle for any sign of leaks. Be sure there are no obstacles behind you if ...
