
 Hyundai Santa Fe: Delivery Pipe. Repair procedures
Removal
In case of removing the high pressure fuel pump, high pressure
fuel pipe, delivery pipe, and injector, there may be injury caused by
leakage of the high pressure fuel. So don’t do any repair work right
after engine stops.
|

| 1. |
Turn the ignition switch OFF and disconnect the battery negative
(-) cable.
|
| 2. |
Release the residual pressure in fuel line.
(Refer to Fuel Delivery System - “Release Residual Pressure in
Fuel Line�)
|

| 3. |
Remove the intake manifold.
(Refer to Engine Mechanical System - "Intake Manifold")
|
| 4. |
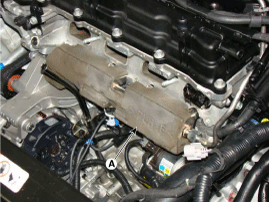
Remove the injector form (A).
|
| 5. |
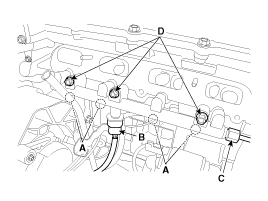
Disconnect the injector connectors (A) and the rail pressure sensor
connector (B).
|
| 6. |
Remove the high pressure fuel pipe (C).
|
| 7. |
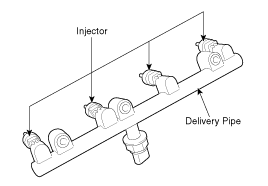
Remove the installation bolt (D), and then remove the delivery
pipe and injector assembly from the engine.
|
Installation
|
|
|
|
|
|
 →
→  →
→
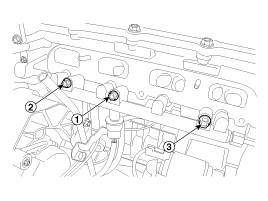
 ) in several cycles up tothe specified
torque. The delivery pipeshould move less than 1/8 inch (approx.3mm),
whenever each bolt is tightened.
) in several cycles up tothe specified
torque. The delivery pipeshould move less than 1/8 inch (approx.3mm),
whenever each bolt is tightened.
| 1. |
Install in the reverse order of removal.
|
 Accelerator Pedal. Repair procedures
Removal 1. Turn the ignition switch OFF and disconnect the negative (-) battery cable. 2. Disconnect the accelerator position sensor connector (A). 3. Remove the installation nuts (C), the bolt (B) and ...
 High Pressure Fuel Pump. Repair procedures
Removal In case of removing the high pressure fuel pump, high pressure fuel pipe, delivery pipe, and injector, there may be injury caused by leakage of the high pressure fuel. So don’t do any repair ...
See also:
SRS Control Module (SRSCM). Components and Components Location
Components ...
Hands Free Mic. Repair procedures
Inspection 1. Disconnect the negative (-) battery terminal. 2. Seperate the handsfree mic (A) from the roof trim. 3. Remove the handsfree mic (B) after disconnecting the handsfree mic connector (A). 4. ...
Floor mat anchor(s)
When using a floor mat on the front floor carpet, make sure it attaches to the floor mat anchor(s) in your vehicle. This keeps the floor mat from sliding forward. WARNING The floor mat must be properly ...
