 Hyundai Santa Fe: Engine Coolant Temperature Sensor (ECTS). Repair procedures
Inspection
| 1. |
Turn the ignition switch OFF.
|
| 2. |
Remove the ECTS (Refer to "Removal").
|
| 3. |
After immersing the thermistor of the sensor into engine coolant,
measure resistance between the ECTS terminals 3 and 4.
|
| 4. |
Check that the resistance is within the specification.
|
Removal
| 1. |
Turn the ignition switch OFF and disconnect the battery negative
(-) cable.
|
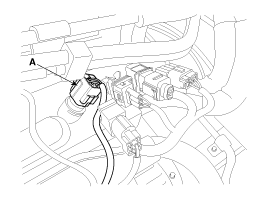
| 2. |
Disconnect the engine coolant temperature sensor connector (A).
|
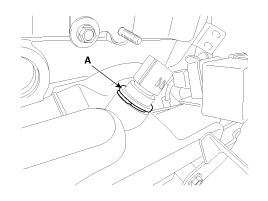
| 3. |
Remove the spring clip (A), and then pull the sensor from the
water temperature control assembly.
|
| 4. |
Supplement the engine coolant.
(Refer to Engine Mechanical System - "Coolant")
|
Installation
|
|
|
| 1. |
Install in the reverse order of removal.
|
 Engine Coolant Temperature Sensor (ECTS). Schematic Diagrams
Circuit Diagram ...
 Crankshaft Position Sensor (CKPS). Description and Operation
Description Crankshaft Position Sensor (CKPS) detects the crankshaft position and is one of the most important sensors of the If there is no CKPS signal input, the engine may stop because of CKPS signal ...
See also:
Schematic Diagrams
Schematic Diagrams MDPS Circuit Diagram Harness Connector Connector Pin no Pin name Battery 1 Battery + 2 Battery - Vehicle signal 1 Igntion 2 - 3 - 4 - 5 - 6 - 7 CAN_High 8 CAN_Low ...
Glove box
Type A Type B The glove box can be locked and unlocked with the mechanical key (1). To open the glove box, push the button (2) and the glove box will automatically open (3). Close the glove box after ...
Low Tire Pressure Warning Light
This warning light illuminates: Once you set the ignition switch or Engine Start/Stop Button to the ON position. - It illuminates for approximately 3 seconds and then goes off. When one or more of your ...
