
 Hyundai Santa Fe: Camshaft Position Sensor (CMPS). Repair procedures
Inspection
| 1. |
Check the signal waveform of the CMPS and CKPS using the GDS.
|
Removal
|

| [Bank 1 / Intake] |
| 1. |
Turn the ignition switch OFF and disconnect the battery negative
(-) cable.
|
| 2. |
Disconnect the camshaft position sensor connector (A).
|
| 3. |
Remove the installation bolt (B), and then remove the sensor.
|
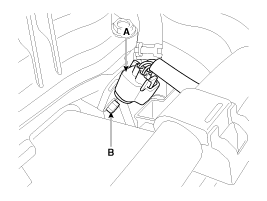
| [Bank 1 / Exhaust] |
| 1. |
Turn the ignition switch OFF and disconnect the battery negative
(-) cable.
|
| 2. |
Disconnect the camshaft position sensor connector (A).
|
| 3. |
Remove the hanger and the protector.
|
| 4. |
Remove the installation bolt (B), and then remove the sensor.
|
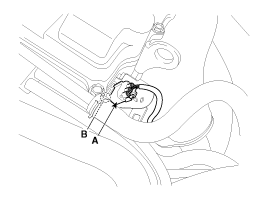
Installation
|

|
|
|
| 1. |
Install in the reverse order of removal.
|
 Camshaft Position Sensor (CMPS). Schematic Diagrams
Circuit Diagram ...
 Knock Sensor (KS). Description and Operation
Description Knocking is a phenomenon characterized by undesirable vibration and noise and can cause engine damage. Knock Sensor (KS) is installed on the cylinder block and senses engine knocking. When ...
See also:
Front Door Window Glass. Repair procedures
Replacement 1. Remove the front door trim. 2. Remove the front door belt inside weatherstrip (A). 3. Remove the front door window glass mounting hole plug (B). • Be careful not to drop the glass and/or ...
Interior lamp bulb replacement
WARNING Prior to working on the Interior Lamps, ensure that the “OFF� button is depressed to avoid burning your fingers or receiving an electric shock. 1. Using a flat-blade screwdriver, gently pry ...
Front Driveshaft. Components and Components Location
Components 1. Front driveshaft (LH) 2. Inner shaft bearing bracket 3. Front driveshaft (RH) [LH] 1. BJ assembly 2. Clip 3. BJ boot band 4. BJ boot 5. Dynamic damper band 6. Dynamic damper 7. Shaft 8. TJ ...
