
 Hyundai Santa Fe: Front Alignment. Repair procedures
Front wheel alignment
When using a commercially available computerized wheel alignment
equipment to inspect the front wheel alignment, always position the
vehicle on a level surface with the front wheels facing straight ahead.
Prior to inspection, make sure that the front suspension and steering
system are in normal operating condition and that the tires are inflated
to the specified pressure.
|

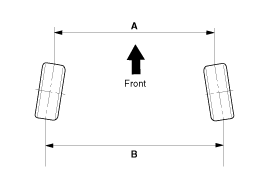
B - A. 0: Toe in (+)
B - A < 0: Toe out (-)
|
| 1. |
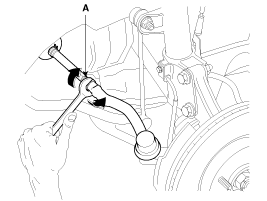
Loosen the tie rod end lock nut.
|
| 2. |
Remove the bellows clip to prevent the bellows from being twisted.
|
| 3. |
Adjust the toe by screwing or unscrewing the tie rod. Toe adjustment
should be made by turning the right and left tie rods by the same amount.
[~2012-09-26]
[2012-09-27~]
|
||||||||||||||||
| 4. |
When completing the toe adjustment, install the bellows clip and
tighten the tie rod end lock nut to specified torque.
|
|
Item |
Description |
|
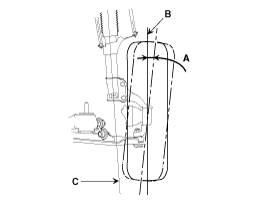
A |
Positive camber angle |
|
B |
True vertical |
|
C |
Strut centerline |
Camber angle : -0.5° ±
0.5°
|
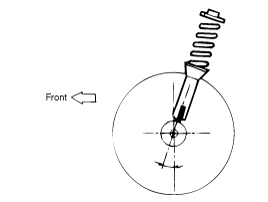
Caster angle : 4.14° ±
0.5°
|
|

 Components and Components Location
Components Location 1. Front axle 2. Front lower arm 3. Drive shaft 4. Sub frame 5. Stabilizer bar 6. Steering gearbox 7. Stabilizer link 8. Front strut assembly ...
 Front Strut Assembly. Components and Components Location
Components 1. Strut assembly 2. Insulator 3. Bearing 4. Spring upper pad 5. Spring 6. Dust cover 7. Spring lower pad ...
See also:
Smart Key Unit. Components and
Components Location
Components (1) Connector Pin Information No. Connector A Connector B Connector C 1 V_BAT load C_CAN Low SSB illumination ground 2 - C_CAN High - 3 Power ground1 - SSB LED OFF 4 IGN1 - Interior antenna ...
Rail Pressure Sensor (RPS). Repair procedures
Inspection 1. Connect the GDS on the Data Link Connector (DLC). 2. Measure the output voltage of the RPS at idle and various engine speed. Condition Output Voltage (V) Idle Approx. 1.2 1,500 rpm ...
ESC operation off
ESC OFF state This car has 2 kinds of ESC off states. If the engine stops when ESC is off, ESC remains off. Upon restarting the engine, the ESC will automatically turn on again. • ESC off state 1 To ...
