 Hyundai Santa Fe: Luggage Side Trim. Repair procedures
Replacement
|
|
| 1. |
Remove the third row seat.
|
| 2. |
Remove the rear door scuff trim.
|
| 3. |
Remove the rear transverse trim.
|
| 4. |
Push the second row seat towards the front of the vehicle as far
as possible.
|
| 5. |
Slighty remove the rear door body side weatherstrip.
|
| 6. |
Slighty remove the tail gate weatherstrip.
|
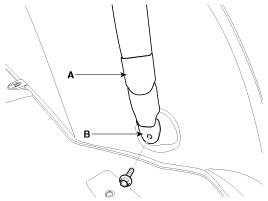
| 7. |
Remove the second row seat belt lower anchor cover (A).
|
| 8. |
After loosening the mounting bolt, then remove the second row
seat belt lower anchor (B).
|
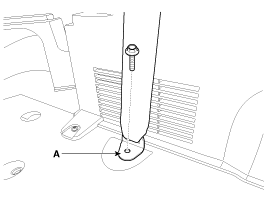
| 9. |
After loosening the mounting bolt, then remove the third row seat
belt lower anchor (A).
|
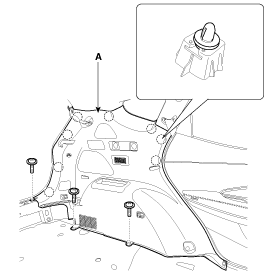
| 10. |
After loosening the mounting screws, then remove the luggage side
trim (A).
|
| 11. |
Install in the reverse order of removal.
|
 Luggage Side Trim. Components and Components Location
Component Location 1. Luggage side trim ...
 Rear Pillar Trim. Components and Components Location
Component Location 1. Rear pillar trim ...
See also:
Parking Assist Sensor. Components and Components Location
Component ...
TPMS Receiver. Schematic Diagrams
System Circuit Diagram No Function 1 MCU part 2 CAN interface part 3 5V supply part 4 Battery detection circuit part 5 RF receiver part 6 Antenna part ...
Before starting
Close and lock all doors. Position the seat so that all controls are easily reached. Adjust the inside and outside rearview mirrors. Be sure that all lights work. Check all gauges. Check the operation ...
