 Hyundai Santa Fe: Alternator. Repair procedures
Removal
| 1. |
Disconnect the battery negative terminal.
|
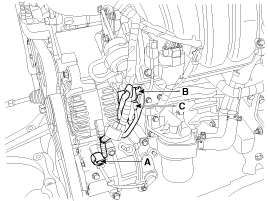
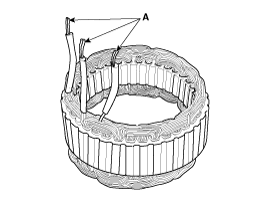
| 2. |
Disconnect the air compressor connector (A) and the alternator
connector (B), and remove the cable from alternator "B" terminal (C).
|
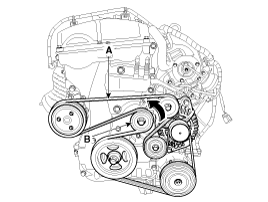
| 3. |
Remove the drive belt (A) after turning the drive belt tensioner
(B) counter clockwise.
|
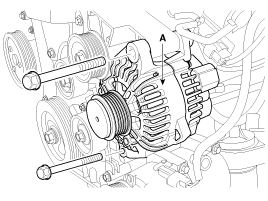
| 4. |
Full out the through bolt and then remove the alternator (A).
|
Installation
| 1. |
Install in the reverse order of removal.
|
| 2. |
Adjust the alternator belt tension after installation.
<a href="content.asp?vehicletype=Passenger&mfrcode=HY&area=HMA&langcode=ENG&modelid=AN13&modelyr=2013&mmctype=en&mmcid=98&group=SHOP&pdftype=&cat1=2013+%3E+G+2%2E4+GDI&ec=&nLocation=2$8_4_3_2&firstnodedesc=Engine+Mechanical+System&sitinfolist=12%5E1205%5E12051110%5Enone%5E801%5E1%5EENG%5EHY%5EAN13%5E2013%5Een%5E98%5Enone%5Enone%5Enone%5ESHOP%5E%2412%5E1205%5E12051110%5Enone%5E801%5E4%5EENG%5EHY%5EAN13%5E2013%5Een%5E98%5Enone%5Enone%5Enone%5ESHOP%5E%24"
target="_blank">(Refer to Engine Mechanical System - "Drive Belt")</a>
|
Disassembly
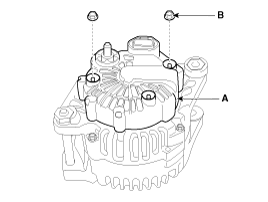
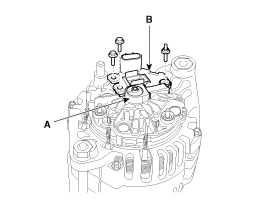
| 1. |
Remove the alternator cover (A) using a screw driver after loosening
the nuts (B).
|
| 2. |
Remove the slip ring guide (A) and then loosen the mounting bolts
and disconnect the brush holder assembly (B).
|
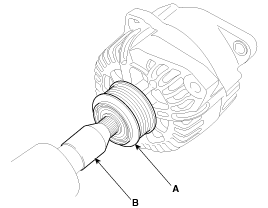
| 3. |
Remove the pulley (A) using the SST (09373-27000) (B).
|
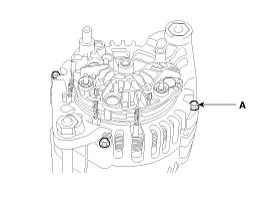
| 4. |
Loosen the 4 through bolts (A).
|
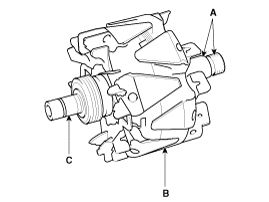
| 5. |
Disconnect the rotor (A) and cover (B).
|

| 6. |
Reassembly is the reverse order of disassembly.
|
Reassembly
| 1. |
Reassemble in the reverse order of disassembly.
|
Inspection
| [Rotor] |
| 1. |
Check that there is continuity between the slip rings (C).
|
| 2. |
Check that there is no continuity between the slip rings and the
rotor (B) or rotor shaft (A).
|
| 3. |
If the rotor fails either continuity check, replace the alternator.
|
| [Stator] |
| 1. |
Check that there is continuity between each pair of leads (A).
|
| 2. |
Check that there is no continuity between each lead and the coil
core.
|
| 3. |
If the coil fails either continuity check, replace the alternator.
|
 Alternator. Schematic Diagrams
Circuit Diagram ...
 Battery. Description and Operation
Description 1. The MF(Maintenance Free) battery is, as the name implies, totally maintenance free and has no removable battery cell caps. 2. The MF(Maintenance Free) battery does not require water replenishment ...
See also:
Audio Unit. Components and Components Location
Components Connector Pin Information No. Connector A Connector B 1 Rear left speaker (+) CAN High 2 Front left speaker (+) TMU Audio (+) (For USA) 3 Front right speaker (+) - 4 Rear right speaker (+) Steering ...
Clothes hanger
To use the hanger, pull down the upper portion of hanger. CAUTION Do not hang heavy clothes, because it may damage the hook. ...
Maintenance when trailer towing
Your vehicle will need service more often when you regularly pull a trailer. Important items to pay particular attention to include engine oil, automatic transaxle fluid, axle lubricant and cooling system ...
