
 Hyundai Santa Fe: Description and Operation
Warning Lamp Activation
| Warning Lamp Behavior after Ignition On |
| 1. |
Active fault or historical fault counter is greater or equal to
10.
|
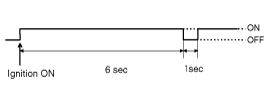
| 2. |
Normal or historical fault counter is less than 10.
|
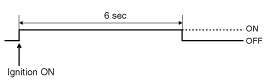
| 3. |
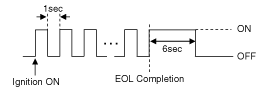
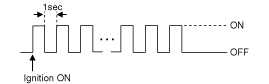
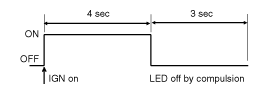
When turning the ignition switch ON during variant coding (EOL)
mode, the airbag warning lamp illuminates and blinks at intervals of
1 second till the coding is completed.
In case the variant coding is completed normally, the airbag warning
lamp is turned on for 6 seconds, and then turned off. Otherwise the
airbag warning lamp continuously blinks at intervals of 1 second.
When there is active fault in airbag system or SRSCM internal
fault, the variant coding (EOL) can’t be completed. In this case, do
the variant coding (EOL) procedure again after troubleshooting with
the GDS.
|
| 1. |
Loss of battery supply to the SRSCM : warning lamp turned on continuously.
|
| 2. |
Loss of internal operating voltage : warning lamp turned on continuously.
|
| 3. |
Loss of Microprocessor operation : warning lamp turned on continuously.
|
| 4. |
SRSCM not connected : warning lamp turned on continuously.
|
 General Safety Information and Caution
Precautions General Precautions Please read the following precautions carefully before performing the airbag system service. Observe the instructions described in this manual, or the airbags could accidentally ...
 Repair procedures
Component Replacement After Deployment Before doing any SRS repairs, use the GDS to check for DTCs. Refer to the Diagnostic Trouble Code list for repairing of the related DTCs. When the front airbag(s) ...
See also:
Components and Components Location
Components 1. Hands free call switch 2. Mic 3. Front left speaker 4. Front right speaker 5. Audio head unit (hands free control) ※ There is no hands free jack. This system supports Bluetooth(wireless ...
Driver's and passenger's front air bag
Your vehicle is equipped with a Supplemental Restraint (Air Bag) System and the lap/shoulder belts at both the driver and passenger seating positions. The indications of the system's presence are ...
Intake Air Temperature Sensor (IATS). Repair procedures
Inspection 1. Turn the ignition switch OFF. 2. Disconnect the IATS connector. 3. Measure resistance between the IATS terminals 3 and 4. 4. Check that the resistance is within the specification. Specification: ...
