
 Hyundai Santa Fe: Glove Box Housing. Repair procedures
Replacement
|

|
| 1. |
Disconnect the stopper (B) from the glove box (A).
|

| 2. |
Disconnect the air damper (A) from the glove box (B).
|

| 3. |
Disconnect the pins (A) and then remove the glove box (B).
|

| 4. |
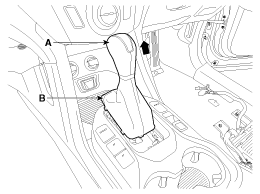
Remove the gear boots (B) and gear knob (A).
|
| 5. |
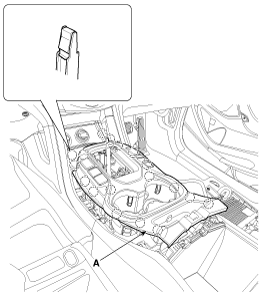
Using a screwdriver or remover, remove the console upper cover
(A).
|
| 6. |
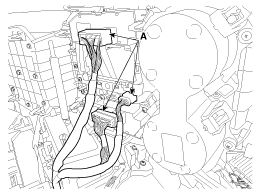
Disconnect the connectors (A).
|
| 7. |
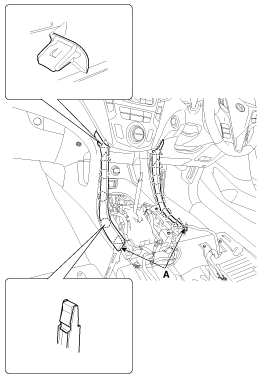
Using a screwdriver or remover, remove the front console garnish
(A).
|
| 8. |
Using a screwdriver or remover, remove the crash pad side cover
[RH] (A).
|

| 9. |
After loosening the mounting screws, then remove the crash pad
garnish [RH] (A).
|

| 10. |
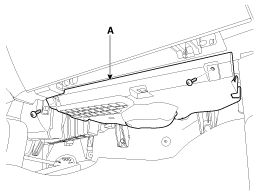
After loosening the mounting screws, then remove the crash pad
under cover [RH] (A).
|
| 11. |
Remove the glove box hose cover (A) by sliding it upward.
|
| 12. |
Remove the glove box hose (B) by sliding it upward.
|


| 13. |
After loosening the mounting screws, then remove the glove box
housing (A).
|

| 14. |
Disconnect the glove box lamp connector (A) and glove box lamp
switch connector (B).
|

| 15. |
Install in the reverse order of removal.
|
 Glove Box Housing. Components and Components Location
Component Location 1. Glove box housing ...
 Steering Column Shroud Panel. Components and Components Location
Component Location 1. Steering column shroud lower panel 2. Steering column shroud upper panel ...
See also:
Intake Air Temperature Sensor (IATS). Repair procedures
Inspection 1. Turn the ignition switch OFF. 2. Disconnect the IATS connector. 3. Measure resistance between the IATS terminals 3 and 4. 4. Check that the resistance is within the specification. Specification: ...
Idler. Repair procedures
Removal and Installation 1. Remove the drive belt. 2. Remove the idler(A). Tightening torque : 53.9 ~ 63.7 N.m (5.5 ~ 6.5 kgf.m, 39.8 ~ 47.0 lb-ft) Check the idler. if it is grease leak or abnormal rotation, ...
Rear Door Belt Outside Weatherstrip. Repair procedures
Replacement 1. Pull down rear door window glass by pressing the power window glass switch. 2. After loosening the mounting screws, then remove the rear door belt outside weatherstrip (A). 3. Install in ...
