 Hyundai Santa Fe: Outside lamp
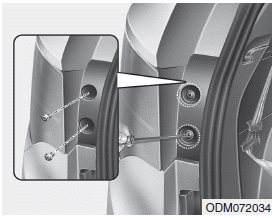
1. Open the tailgate.
2. Remove the service cover using a flat-blade screwdriver.
3. Loosen the lamp assembly retaining please verify.
4. Remove the rear combination lamp assembly from the body of the vehicle.
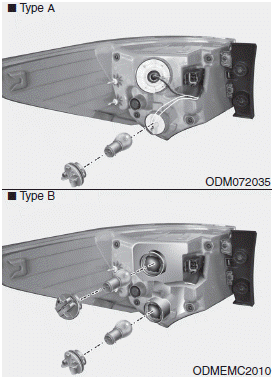
5. Remove the socket from the assembly by turning the socket counterclockwise
until the tabs on the socket align with the slots on the assembly.
6. Remove the bulb from the socket by pressing it in and rotating it counterclockwise
until the tabs on the bulb align with the slots in the socket. Pull the bulb out
of the socket. (Side marker : Remove the bulb from the socket by pulling it out)
7. Insert a new bulb by inserting it into the socket and rotating it until it locks
into place.
8. Install the socket in the assembly by aligning the tabs on the socket with the
slots in the assembly. Push the socket into the assembly and turn the socket clockwise.
9. Reinstall the lamp assembly to the body of the vehicle.
 Rear combination lamp bulb replacement
(1) Rear stop and tail lamp (2) Rear tail lamp (3) Rear turn signal lamp (4) Back-up lamp (5) Rear side marker ...
 Inside lamp
1. Open the tailgate. 2. Remove the service cover using a flat-blade screwdriver. 3. Remove the socket from the assembly by turning the socket counterclockwise until the tabs on the socket align with ...
See also:
Wheel. Repair procedures
Hub nut tightening sequence Tighten the hub nuts as follows. Tightening torque: 88.3 ~ 107.9N.m (9.0 ~ 11.0kgf.m, 65.1 ~ 79.6lb-ft) When using an impact gun, final tightening torque should be checked using ...
Crankshaft Damper Pulley. Repair procedures
Removal and Installation 1. Remove the drive belt. 2. Remove the passenger engine room side cover. 3. Remove the passenger front tire. 4. Remove the crankshaft damper pulley(A). Tightening torque : 166.6 ...
Pre-tensioner seat belt
Your vehicle is equipped with driver's and front passenger's pre-tensioner seat belts (retractor pretensioner and EFD (Emergency Fastening Device)). The pre-tensioner seat belts can be activated, ...
