 Hyundai Santa Fe: Passive Occupant Detection System (PODS-F). Repair procedures
Removal
PODS-F ODU (Occupant Detection Unit)
| 1. |
Disconnect the battery negative cable, and wait for at least three
minutes before beginning work.
|
| 2. |
Remove the front passenger seat assembly.
|
| 3. |
Disconnect the PODS-F ODU connector.
|
| 4. |
Remove the PODS-F ODU.
|
PODS-F Mat
| 1. |
Disconnect the battery negative cable, and wait for at least three
minutes before beginning work.
|
| 2. |
Remove the front passenger seat assembly.
|
| 3. |
Disconnect the PODS-F mat connector.
|
| 4. |
Remove the front seat cushion assembly
|
ąÜąŠą╝ą┐čĆąĄčüčüąŠčĆ ą▓ąŠąĘą┤čāčłąĮčŗą╣ ą╝ąĄą╝ą▒čĆą░ąĮąĮčŗą╣: ą║čāą┐ąĖčéčī ą╝ąĄą╝ą▒čĆą░ąĮąĮčŗąĖ ą║ąŠą╝ą┐čĆąĄčüčüąŠčĆ www.vac-industry.ru.
Installation
PODS-F ODU
| 1. |
Install the PODS-F ODU on the Front seat track assembly.
|
| 2. |
Connect the PODS-F ODU connector.
|
| 3. |
Install the front passenger seat assembly.
|
| 4. |
Reconnect the battery negative cable.
|
| 5. |
After installing the PODS-F, confirm proper system operation :
|
PODS-F Mat
| 1. |
Install the PODS-F Mat equipped seat cushion assembly on the front
seat assembly.
|
| 2. |
Connect the PODS-F mat connector.
|
| 3. |
Install the front passenger seat assembly.
|
| 4. |
Reconnect the battery negative cable.
|
| 5. |
After installing the PODS-F, confirm proper system operation :
|
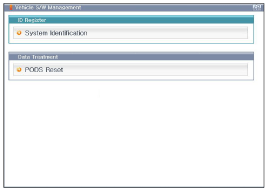
PODS-F zeroing Procedure
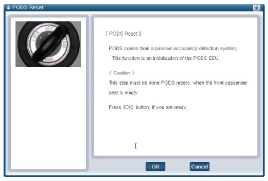
You should perform PODS-F Re-zero procedure after service or replacement
about all part of the passenger seat.
| - |
Seat assembly, Seat foam and Seat Cushion Assembly Replacement
(PODS-F ODU No Replacement): C1[Auto]
|
| - |
PODS-F ODU Replacement: C2[Manual]:
|
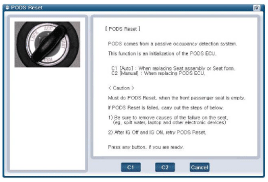
C1[Auto] Procedure
| 1. |
Ignition ŌĆ£OFFŌĆØ, connect GDS.
|
| 2. |
Ignition ŌĆ£ONŌĆØ & Engine ŌĆ£OFFŌĆØ, select Airbag system and ŌĆ£PODS-F
ResetŌĆØ mode.
|
| 3. |
Select C1.
C1[Auto] : When replacing seat assembly or Seat foam.
|
| 4. |
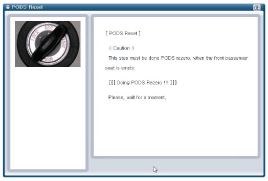
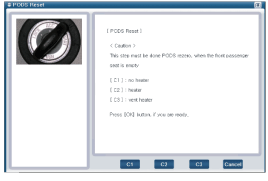
The GDS will show the two PODS-F Zeroing function steps.
|
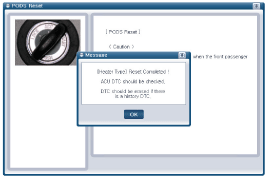
| 5. |
The PODS-F initialization procedure will be performed.
[Heater type]
[No heater type]
[Vent heater type]
|

C2[Manual] Procedure
| 1. |
Ignition ŌĆ£OFFŌĆØ, connect GDS.
|
| 2. |
Ignition ŌĆ£ONŌĆØ & Engine ŌĆ£OFFŌĆØ, select Airbag system and ŌĆ£PODS-F
ResetŌĆØ mode.
|
| 3. |
Select C2.
C2[Manual]: When replacing PODS-F ODU
|
| 4. |
Select seat type.
|
| 5. |
The GDS will show the two PODS-F Zeroing function steps.
|
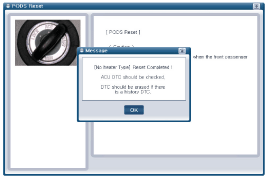
| 6. |
The PODS-F initialization procedure will be performed.
[Heater type]
[No heater type]
[Vent heater type]
|

 Schematic Diagrams
Circuit Diagram (1) Circuit Diagram (2) Circuit Diagram (3) SRSCM Connector terminal Pin Function (Connector A) Pin Function (Connector B) 1 Ignition 1 Seat belt pretensioner [Driver] High 2 Passenger ...
See also:
Air Ventilation Seat. Schematic
Diagrams
Circuit Diagram ...
Power outlet
Front Center Rear The power outlet is designed to provide power for mobile telephones or other devices designed to operate with vehicle electrical systems. The devices should draw less than 10 amps with ...
Valve Body. Components and Components Location
Component Location 1. Automatic transaxle 2. Valve body assembly 1. Pressure Control Valve(PCV) adjust screw 2. Solenoid valve bracket 3. Oil temperature sensor 4. Line Pressure Control Solenoid Valve ...
