
 Hyundai Santa Fe: Power Door Lock Actuators. Repair
procedures
Hyundai Santa Fe: Power Door Lock Actuators. Repair
procedures
Inspection
Front Door Lock Module Inspection
| 1. |
Remove the front door trim.
|
| 2. |
Remove the front door module.
|
| 3. |
Disconnect the connectors from the actuator.
|
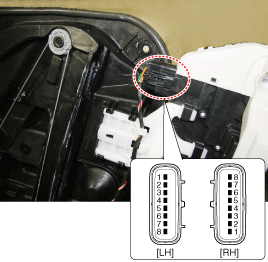
| 4. |
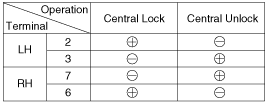
Check actuator operation by connecting power and
ground according to the table. To prevent damage to the actuator, apply
battery voltage only momentarily.
|
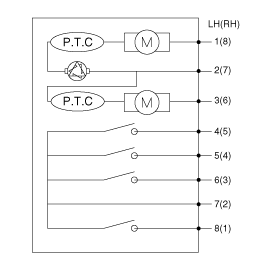
| 5. |
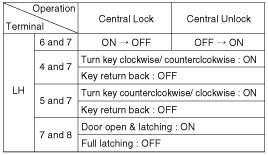
Check for continuity between the terminals in each
switch position according to the table.
|
Rear Door Lock Module Inspection
| 1. |
Remove the rear door trim.
|
| 2. |
Remove the rear door module.
|
| 3. |
Disconnect the connectors from the actuator.
|
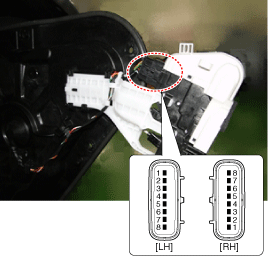
| 4. |
Check actuator operation by connecting power and
ground according to the table. To prevent damage to the actuator, apply
battery voltage only momentarily.
|
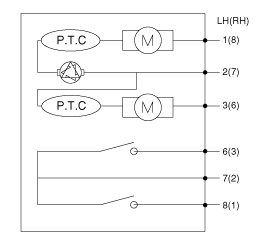
| 5. |
Check for continuity between the terminals in each
switch position according to the table.
|
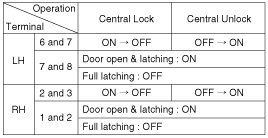
Tailgate Lock Module Inspection
| 1. |
Remove the tailgate trim.
|
| 2. |
Disconnect the 4P connector from the actuator.
|
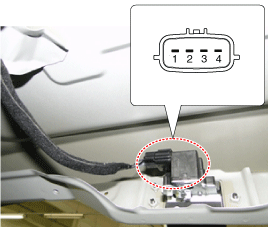
| 3. |
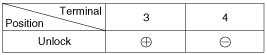
Check actuator operation by connecting power and
ground according to the table. To prevent damage to the actuator, apply
battery voltage only momentarily.
|
Tailgate Open Switch
| 1. |
Remove the tailgate trim.
|
| 2. |
Disconnect the 4P connector from the actuator.
|
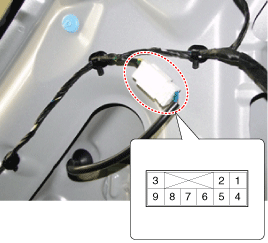
| 3. |
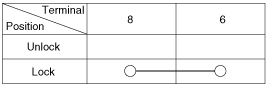
Check for continuity between the terminals in each
switch position according to the table.
|
Hood Switch
| 1. |
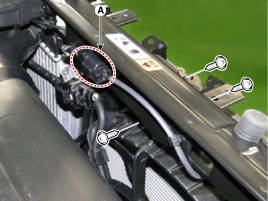
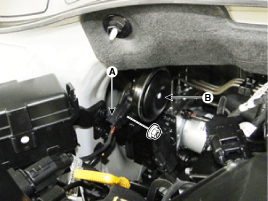
Disconnect the connector (A) and bolts from the hood
switch.
|
| 2. |
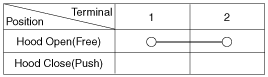
Check for continuity between the terminals and ground
according to the table.
|
Burglar Horn
| 1. |
Remove the burglar horn after removing a bolt and
disconnect the 2P connector from the burglar horn.
|
| 2. |
Test the burglar horn by connecting battery power
to the terminal 1 and ground the terminal 2.
|
| 3. |
The burglar horn should sound. If the burglar horn
fails to sound replace it.
|
 Components and Components Location
Component Location 1. Driver power window main switch 2. Passenger window switch 3. IPM (Intalligent intergrated Platform Module) 4. Door lock switch 5. Tailgate lock actuator & switch 6. Front door ...
 Power Door Lock Switch. Repair
procedures
Power Door Lock Switch. Repair
procedures
Diagnosis With GDS 1. The BCM can be diagnosed by using the GDS. The BCM communicates with the GDS which then displays inputs and outputs along with codes. It will be able to diagnose defects of power ...
See also:
Output Speed Sensor. Specifications
Specifications ▷ Type: Hall effect sensor Operation condition (°C)°F ((-)40~150)) -40~302 Air gap(mm)in. (0.25~0.70) 0.0098~0.0276 Output voltage (V) High 1.18~1.68 Low 0.59~0.84 ...
Audio system
✽ NOTICE If you install an aftermarket HID headlamp, your vehicle's audio and electronic device may malfunction. ...
Line Pressure Control Solenoid Valve. Specifications
Specifications Direct control VFS[LINE Pressure] ▷ Control type : Normal high type Control Pressure kpa (kgf/cm², psi) 500.14~9.81 (5.1~0.1,72.54~1.42) Current value(mA) 50~850 Internal resistance(Ω) ...
