 Hyundai Santa Fe: Seat Belt Pretensioner (BPT). Repair procedures
Removal
| 1. |
Disconnect the battery negative cable, and wait for at least three
minutes before beginning work.
|
| 2. |
Left side - Remove the seat belt lower anchor cover (A). After
loosening the mounting bolt, then remove the seat belt lower anchor
(B).
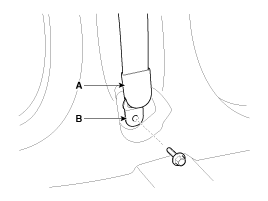
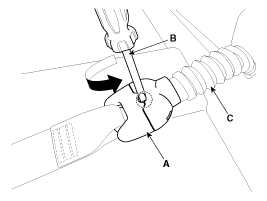
Right side - To remove the locking mechanism (A), using a (-)
driver (B) turn it counter clockwise. From the emergency fastening device
(EFD) system (C)
|
| 3. |
Remove the door scuff trim.
|
| 4. |
Remove the center pillar trim
|
| 5. |
Remove the upper anchor bolt.
|
| 6. |
Loosen the seat belt pretensioner mounting bolts (A,B) and remove
the seat belt pretensioner.
|
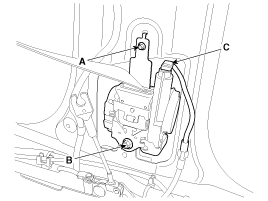
| 7. |
Disconnect the seat belt pretensioner connector (C).
|
Installation
| 1. |
Remove the ignition key from the vehicle.
|
| 2. |
Disconnect the battery negative cable and wait for at least three
minutes.
|
| 3. |
Connect the seat belt pretensioner (BPT) connector (C).
|
| 4. |
Install the seat belt pretensioner with a bolts (A,B).
|
| 5. |
Install the upper anchor bolts.
|
| 6. |
Install the center pillar trim
|
| 7. |
Install the door scuff trim.
|
| 8. |
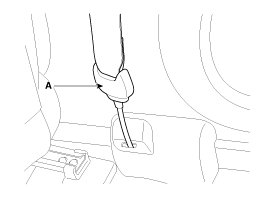
Left side - Install the lower anchor bolts.
Right side - Insert the seat belt to the Emergency fastening device
(A).
|
| 9. |
Reconnect the battery negative cable.
|
| 10. |
After installing the seat belt pretensioner, confirm proper system
operation:
|

 Emergency Fastening Device (EFD). Description and Operation
Description The Emergency Fastening Device (EFD) operates as well as the belt pretensioner at the same time, if it gets into its deploy condition after a collision. It is located near the anchor on the ...
See also:
Good driving practices
Never move the shift lever from P (Park) or N (Neutral) to any other position with the accelerator pedal depressed. Never move the shift lever into "P" when the vehicle is in motion. Be sure ...
Instrument Cluster. Repair
procedures
Removal 1. Disconnect the negative (-) battery terminal. 2. Remove the cluster fascia panel (A). 3. Remove the cluster (A) from the housing after removing 2 screws. 4. Disconnect the cluster connecter ...
To remove the cargo security screen from the luggage tray
1. Pull up the screen board. 2. Push in the guide pin. 3. While pushing the guide pin, pull out the cargo security screen. WARNING Do not place objects on the cargo security screen. Such objects may be ...
