 Hyundai Santa Fe: Canister Close Valve (CCV). Repair procedures
Inspection
| 1. |
Turn the ignition switch OFF.
|
| 2. |
Disconnect the CCV connector.
|
| 3. |
Measure resistance between the CCV terminal 1 and 2.
|
| 4. |
Check that the resistance is within the specification.
|
| 5. |
Disconnect the vapor hose connected with the canister from the
CCV.
|
| 6. |
Connect a vacuum pump to the nipple.
|
| 7. |
Ground the CCV control line and apply battery voltage to the CCV
power supply line.
|
| 8. |
Apply vacuum and check the valve operation.
|
Removal
| 1. |
Turn the ignition switch OFF and disconnect the battery negative
(-) cable.
|
| 2. |
Lift the vehicle.
|
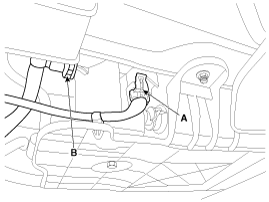
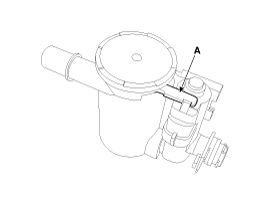
| 3. |
Disconnect the canister close valve connector (A).
|
| 4. |
Disconnect the ventilation tube quick-connector (B) from the fuel
tank air filter and canister close valve.
|
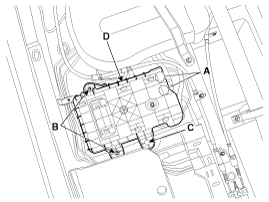
| 5. |
Disconnect the vapor tube quick-connector (A).
|
| 6. |
Remove the canister assembly bracket (D) after removing the mounting
bolts (B) and nut (C).
|
| 7. |
Remove the canister braket (B) installation bolt (A).
|
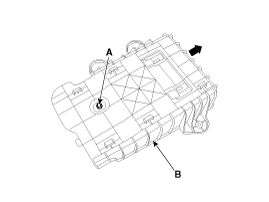
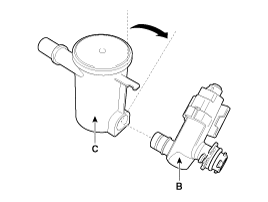
| 8. |
Remove the fuel tank air filter & canister close valve assembly
(A) after rotating it in the direction of the arrow in the figure.
|
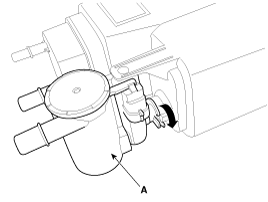
| 9. |
Release the lever (A), and then separate the canister close valve
(B) from the fuel tank air filter (C) after rotating it in the direction
of the arrow in the figure.
|
Installation
|
| 1. |
Install in the reverse order of removal.
|
 Canister Close Valve (CCV). Schematic Diagrams
Circuit Diagram ...

See also:
Brake Booster. Components and Components Location
Components (1) 1. Brake booster 2. Master cylinder assembly 3. O-ring Components (2) 1. Vacuum pump 2. Bracket ...
Passive Occupant Detection System (PODS-F). Repair procedures
Removal PODS-F ODU (Occupant Detection Unit) 1. Disconnect the battery negative cable, and wait for at least three minutes before beginning work. 2. Remove the front passenger seat assembly. 3. Disconnect ...
Rear Disc Brake. Repair procedures
Removal 1. Remove the rear wheel & tire. Tightening torque: 88.3 ~ 107.9 N.m (9.0 ~ 11.0 kgf.m, 65.1 ~ 79.6 lb-ft) 2. Loosen the hose eyebolt (B) and caliper mounting bolts (C), then remove the rear ...
