 Hyundai Santa Fe: Crash Pad Lower Panel. Repair procedures
Replacement
|
|
| 1. |
Using a screwdriver or remover, remove the crash pad side cover
[LH] (A).
|
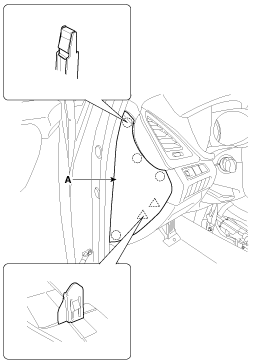
| 2. |
After loosening the mounting screws, then remove the crash pad
lower panel (A).
|

| 3. |
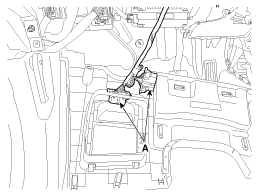
Disconnect the diagnosis connector (A).
|
| 4. |
Install in the reverse order of removal.
|
 Crash Pad Lower Panel. Components and Components Location
Component Location 1. Crash pad lower panel ...
 Glove Box Housing. Components and Components Location
Component Location 1. Glove box housing ...
See also:
Checking the coolant level
Removing radiator cap Never attempt to remove the radiator cap while the engine is operating or hot. Doing so might lead to cooling system and engine damage and could result in serious personal injury ...
Heated Schematic Diagrams
System Circuit Diagram Terminal Function Housing Pin Function Wire color Pad A GND Back B HEATER Yellow C NTC+ Back / Yellow D NTC- Back Remote control A GND Back B BAT Red C LED Green D SWITCH White ...
Reset items
Items should be reset after the battery has been discharged or the battery has been disconnected. Auto up/down window (See section 4) Sunroof (See section 4) Trip computer (See section 4) Climate control ...
