 Hyundai Santa Fe: Dynamic Damper. Repair procedures
Removal
| 1. |
Remove the front driveshaft.
|
| 2. |
Remove the TJ joint assembly.
|
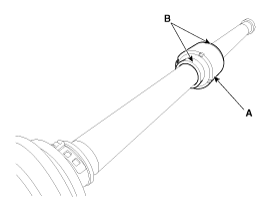
| 3. |
Remove the remove the both side of band (B) of the dynamic damper
(A).
|
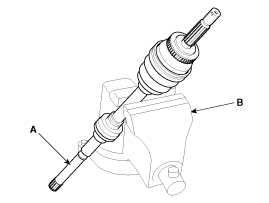
| 4. |
Fix the driveshaft (A) with a vice (B) as illustrated.
|
| 5. |
Apply soap powder on the shaft to prevent being damaged between
the shaft spline and the dynamic damper when the dynamic damper is removed.
|
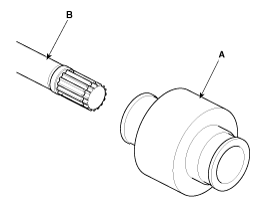
| 6. |
Seperate the dynamic damper (A) from the shaft (B) carefully.
|
Installation
| 1. |
Apply soap powder on the shaft to prevent being damaged between
the shaft spline and the dynamic damper.
|
| 2. |
Install the dynamic damper.
|
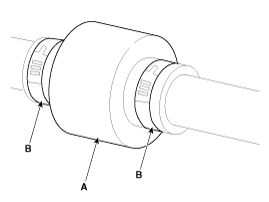
| 3. |
Install the dynamic damper band (A).
|
| 4. |
Using the SST(09495-3K000), secure the TJ boot bands (B).
|
| 5. |
Install the TJ joint assembly.
|
| 6. |
Install the front driveshaft.
|
| 7. |
Check the front alignment.
|
 Dynamic Damper. Components and Components Location
Components 1. BJ assembly 2. BJ circlip 3. BJ boot band 4. BJ boot 5. Dynamic damper band 6. Dynamic damper 7. Shaft 8. TJ boot band 9. TJ boot 10. Spider assembly 11. Retainer ring 12. TJ housing 13. ...
 BJ Boot. Components and Components Location
Components 1. BJ assembly 2. BJ circlip 3. BJ boot band 4. BJ boot 5. Dynamic damper band 6. Dynamic damper 7. Shaft 8. TJ boot band 9. TJ boot 10. Spider assembly 11. Retainer ring 12. TJ housing 13. ...
See also:
Canister Close Valve (CCV). Repair procedures
Inspection 1. Turn the ignition switch OFF. 2. Disconnect the CCV connector. 3. Measure resistance between the CCV terminal 1 and 2. 4. Check that the resistance is within the specification. Specification: ...
Towing service
If emergency towing is necessary, we recommend having it done by an authorized HYUNDAI dealer or a commercial tow-truck service. Proper lifting and towing procedures are necessary to prevent damage to ...
Tail Gate Latch. Components and Components Location
Component Location 1. Tail gate latch assembly ...
