
 Hyundai Santa Fe: Fuel Pump. Repair procedures
Inspection
| 1. |
Turn the ignition switch OFF, and then remove battery (-) cable.
|
| 2. |
Remove the fuel pump assembly.
|
| 3. |
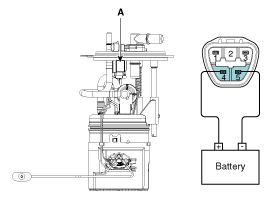
Check motor operation by fuel pump connector (A) connecting power
(No.4) and ground (No.5).
|
| 1. |
Turn the ignition switch OFF, and then remove battery (-) cable.
|
| 2. |
Remove the fuel pump assembly.
|
| 3. |
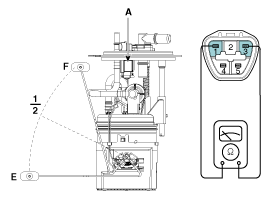
Using an ohmmeter, measure the resistance between terminals 1
and 3 of sender connector (A) at each float level.
|
| 4. |
Also check that the resistance changes smoothly when the float
is moved from "E" to "F".
|
Removal
| 1. |
Release the residual pressure in fuel line.
(Refer to Fuel Delivery System - “Release Residual Pressure in
Fuel Line�)
|
| 2. |
Remove the rear seat.
(Refer to Body - “Rear Seat Assembly�)
|
| 3. |
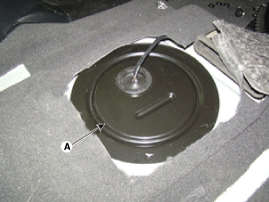
Remove the fuel pump service cover (A).
|
| 4. |
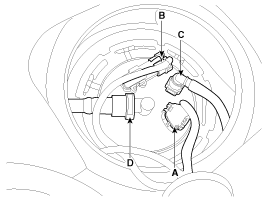
Disconnect the fuel pump connector (A) and the fuel tank pressure
sensor connector (B).
|
| 5. |
Disconnect the fuel feed tube quick connector (C) and the vapor
tube quick-connector (D).
|
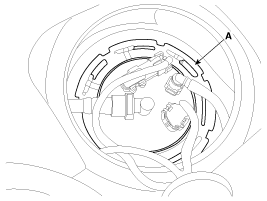
| 6. |
Remove locking ring (A) by using the special service tool.
|
| 7. |
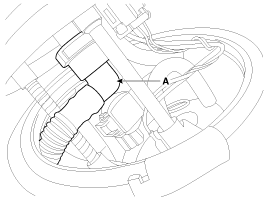
Disconnector the vapor tube quck-connector (A) at the fuel pump,
and then remove the fuel pump from the fuel tank.
|

Installation
| 1. |
Install in the reverse order of removal.
|

 Fuel Tank. Repair procedures
Removal 1. Release the residual pressure in fuel line. (Refer to Fuel Delivery System - “Release Residual Pressure in Fuel Line�) 2. Remove the rear seat assembly. (Refer to Body - “Rear Seat Assembly") ...
 Fuel Filter. Repair procedures
Removal 1. Remove the fuel pump. (Refer to Fuel Delivery System - “Fuel Pump�) 2. Disconnect the fuel sender connector (A). 3. Release the fixing hooks, and then remove the fuel sender (A). 4. Release ...
See also:
Crach Pad Center Panel. Repair procedures
Replacement • Put on gloves to protect your hands. • When prying with a flat-tip screwdriver, wrap it with protective tape, and apply protective tape around the related parts, to prevent damage. • ...
Crankshaft Position Sensor (CKPS). Description and Operation
Description Crankshaft Position Sensor (CKPS) detects the crankshaft position and is one of the most important sensors of the If there is no CKPS signal input, the engine may stop because of CKPS signal ...
Instrument Cluster Control
Adjusting Instrument Cluster Illumination The brightness of the instrument panel illumination is changed by moving the illumination control knob right or left when the ignition switch or Engine Start/Stop ...
