 Hyundai Santa Fe: Luggage Side Trim. Repair procedures
Replacement
|
|
| 1. |
Remove the third row seat.
|
| 2. |
Remove the rear door scuff trim.
|
| 3. |
Remove the rear transverse trim.
|
| 4. |
Push the second row seat towards the front of the vehicle as far
as possible.
|
| 5. |
Slighty remove the rear door body side weatherstrip.
|
| 6. |
Slighty remove the tail gate weatherstrip.
|
| 7. |
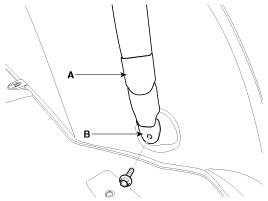
Remove the second row seat belt lower anchor cover (A).
|
| 8. |
After loosening the mounting bolt, then remove the second row
seat belt lower anchor (B).
|
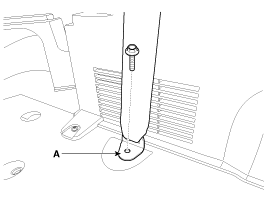
| 9. |
After loosening the mounting bolt, then remove the third row seat
belt lower anchor (A).
|
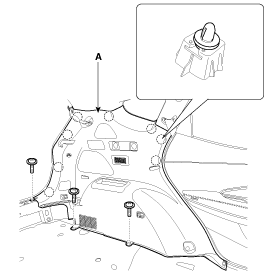
| 10. |
After loosening the mounting screws, then remove the luggage side
trim (A).
|
| 11. |
Install in the reverse order of removal.
|
 Luggage Side Trim. Components and Components Location
Component Location 1. Luggage side trim ...
 Rear Pillar Trim. Components and Components Location
Component Location 1. Rear pillar trim ...
See also:
Compass function
The Compass can be turned ON and OFF and will remember the last state when the ignition is cycled. To turn the display feature ON/OFF: 1. Press and release the button within 1 second to turn the display ...
Rear Coil Spring. Repair procedures
Removal 1. Remove the rear wheel and tire (A) from rear hub . Tightening torque : 88.2 ~ 107.8 N.m (9.0 ~ 11.0 kgf.m, 65.0 ~ 79.5 lb-ft) Be careful not to damage to the hub bolts when removing the rear ...
Repair procedures
General Inspection After or before servicing the EPS system, perform the troubleshooting and test procedure as follows. Compare the system condition with normal condition in the table below and if abnormal ...
