Replacement
[Second row seat belt assembly]
| •
|
When installing the belt, make sure not to damage the
retractor.
|
|
|
1. |
Remove the rear pillar trim.
|
|
2. |
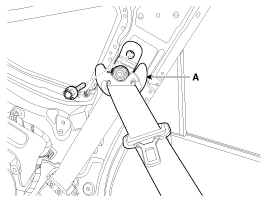
After loosening the mounting bolt, then remove the second row
seat belt upper anchor (A).
Tightening torque :
39.2 ~ 53.9 N.m (4.0 ~ 5.5 kgf.m, 28.8 ~ 39.8 lb-ft)
|
|
|
3. |
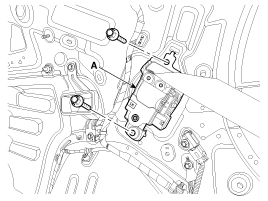
After loosening the mounting bolt, then remove the second row
seat belt retractor (A).
Tightening torque :
39.2 ~ 53.9 N.m (4.0 ~ 5.5 kgf.m, 28.8 ~ 39.8 lb-ft)
|
|
|
4. |
Install in the reverse order of removal.
|
• |
Make sure the connector is plugged in properly.
|
|
• |
Replace any damaged clips.
|
|
|
[Third row seat belt assembly]
| •
|
When installing the belt, make sure not to damage the
retractor.
|
|
|
1. |
Remove the luggage side trim.
|
|
2. |
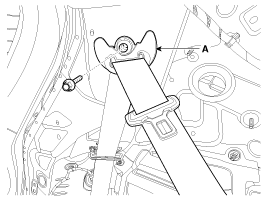
After loosening the mounting bolt, then remove the third row seat
belt upper anchor (A).
Tightening torque :
39.2 ~ 53.9 N.m (4.0 ~ 5.5 kgf.m, 28.8 ~ 39.8 lb-ft)
|
|
|
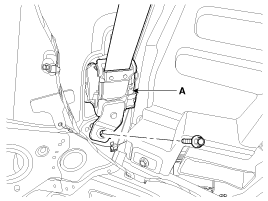
3. |
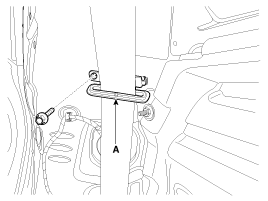
After loosening the mounting bolt, then remove the third row seat
belt webbing guide (A).
|
|
4. |
After loosening the mounting bolt, then remove the third row seat
belt retractor (A).
Tightening torque :
39.2 ~ 53.9 N.m (4.0 ~ 5.5 kgf.m, 28.9 ~ 39.8 lb-ft)
|
|
|
5. |
Install in the reverse order of removal.
|
• |
Make sure the connector is plugged in properly.
|
|
• |
Replace any damaged clips.
|
|
|
Component Location 1. Second row seat belt retractor 2. Third row seat belt retractor ...
Component Location 1. Rear center seat belt retractor ...
See also:
Specifications
Tightening Torques Item N.m kgf.m lb-ft Passenger airbag(PAB) 7.8 ~ 11.8 0.8 ~ 1.2 5.8 ~ 8.7 Curtain airbag (CAB) Bolt 7.8 ~ 10.8 0.8 ~ 1.2 5.8 ~ 8.7 Nut 3.9 ~ 5.9 0.4 ~ 0.6 2.9 ~ 4.3 Knee airbag (KAB) ...
Specifications
Specifications Items Specification Hood Type Rear hinged, gas lifter type Front Door Construction Front hinged, frame door construction Regulator system Wire drum type Locking system Pin-fork system Rear ...
CVVT & Camshaft. Repair procedures
Removal 1. Remove the cylinder head cover. 2. Set No.1 cylinder to TDC/compression. A. Turn the crankshaft pulley and align its groove with the timing mark "T" of the lower timing chain cover. ...
 Hyundai Santa Fe: Rear Seat Belt Retractor. Repair procedures
 Rear Seat Belt Retractor. Components and Components Location
 Rear Center Seat Belt Retractor. Components and Components Location


