Replacement
[Second row seat assembly]
| •
|
Put on gloves to protect your hands.
|
|
| •
|
When prying with a flat-tip screwdriver, wrap it with
protective tape, and apply protective tape around the related
parts, to prevent damage.
|
| •
|
Use a plastic panel removal tool to remove interior trim
pieces to protect from marring the surface.
|
| •
|
Take care not to bend or scratch the trim and panels.
|
|
|
1. |
Remove the second row seat assembly [LH].
|
|
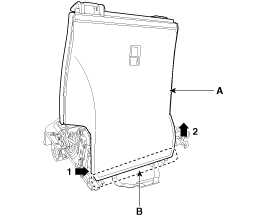
2. |
Holding the bottom (B) lift up the rear seat back panel (A) to
the direction of the arrow.
|
|
3. |
Disconnect the rear seat folding cable (A).

|
|
4. |
After loosening the mounting screws, then remove the rear seat
folding cover (A).
|
|
5. |
Install in the reverse order of removal.
|
• |
Replace any damaged clips.
|
|
|
[Third row seat assembly]
| •
|
Put on gloves to protect your hands.
|
|
| •
|
When prying with a flat-tip screwdriver, wrap it with
protective tape, and apply protective tape around the related
parts, to prevent damage.
|
| •
|
Use a plastic panel removal tool to remove interior trim
pieces to protect from marring the surface.
|
| •
|
Take care not to bend or scratch the trim and panels.
|
|
|
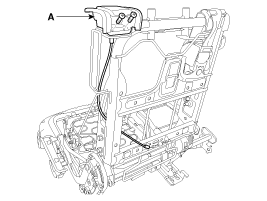
1. |
Remove the rear seat back cover.
|
|
2. |
After loosening the mounting screws, then remove the rear seat
latch cover (A).

|
|
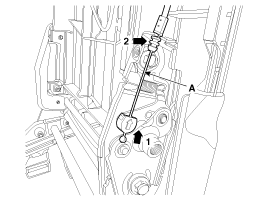
3. |
Disconnect the rear seat latch cable (A).
|
|
4. |
After loosening the mounting bolts (A), then remove the rear seat
latch (B).
Tightening torque :
19.6 ~ 29.4 N.m (2.0 ~ 3.0 kgf.m, 14.5 ~ 21.7 lb-ft)
|
|
|
5. |
Install in the reverse order of removal.
|
• |
Replace any damaged clips.
|
|
|
Component Location [Second row seat assembly] 1. Rear seat latch [Third row seat assembly] 1. Rear seat latch ...
Component Location [Second row seat assembly] (LH) 1. Rear seat back frame assembly 2. Rear seat cushion frame assembly (RH) 1. Rear seat back frame assembly 2. Rear seat cushion frame assembly [Third ...
See also:
Front Wheel Repair procedures
Removal 1. Remove the driveshaft and axle. 2. Remove the propeller shaft (A). Tightening torque : 49.0~68.6N.m (5.0~7.0kgf.m, 36.2~50.6lb-ft) 3. Loosen the transfer upper & lower mounting bolts. (transfer ...
Vehicle weight
This section will guide you in the proper loading of your vehicle and/or trailer, to keep your loaded vehicle weight within its design rating capability, with or without a trailer. Properly loading your ...
Windows
(1) Driver’s door power window switch (2) Front passenger’s door power window switch (3) Rear door (left) power window switch (4) Rear door (right) power window switch (5) Window opening and closing ...
 Hyundai Santa Fe: Rear Seat Latch. Repair procedures
 Rear Seat Latch. Components and Components Location
 Rear Seat Frame Assembly. Components and Components Location