See also:
Special Service Tools
Special Service Tools Tools (Number and name) Illustration Use 09200-3N000 Engine support fixture(Beam) Removal and installation of the transaxle. Except lower supporter, use beam only with new engine ...
Luggage net (holder)
Type A Type B To keep items from shifting in the cargo area, you can use the four holders located in the cargo area to attach the luggage net. If necessary, contact your authorized HYUNDAI dealer to obtain ...
Do not lie down
To reduce the chance of injuries in the event of an accident and to achieve maximum effectiveness of the restraint system, all passengers should be sitting up and the front and rear seats should be in ...
 Hyundai Santa Fe: Sunvisor. Repair procedures
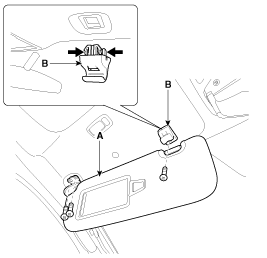
 Sunvisor. Components and Components Location
 Assist Handle. Components and Components Location