Replacement
[Center pillar lower trim]
| •
|
Put on gloves to protect your hands.
|
|
| •
|
When prying with a flat-tip screwdriver, wrap it with
protective tape, and apply protective tape around the related
parts, to prevent damage.
|
| •
|
Use a plastic panel removal tool to remove interior trim
pieces to protect from marring the surface.
|
| •
|
Take care not to bend or scratch the trim and panels.
|
|
|
1. |
Remove the front door scuff trim.
|
|
2. |
Remove the rear door scuff trim.
|
|
3. |
Slighty remove the front door body side weatherstrip.
|
|
4. |
Slighty remove the rear door body side weatherstrip.
|
|
5. |
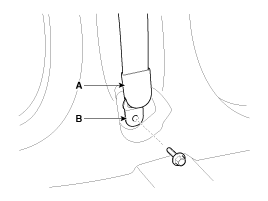
Remove the seat belt lower anchor cover (A).
|
|
6. |
After loosening the mounting bolt, then remove the seat belt lower
anchor (B).
Tightening torque :
39.2 ~ 53.9 N.m (4.0 ~ 5.5 kgf.m, 28.8 ~ 39.8 lb-ft)
|
|
|
7. |
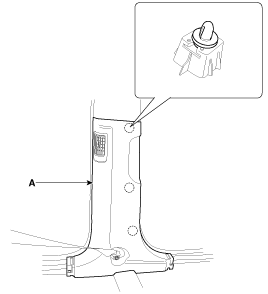
Using a screwdriver or remover, remove the center pillar lower
trim (A).
|
|
8. |
Install in the reverse order of removal.
|
• |
Replace any damaged clips.
|
|
|
| •
|
Put on gloves to protect your hands.
|
|
| •
|
When prying with a flat-tip screwdriver, wrap it with
protective tape, and apply protective tape around the related
parts, to prevent damage.
|
| •
|
Use a plastic panel removal tool to remove interior trim
pieces to protect from marring the surface.
|
| •
|
Take care not to bend or scratch the trim and panels.
|
|
|
1. |
Remove the front door scuff trim.
|
|
2. |
Remove the rear door scuff trim.
|
|
3. |
Slighty remove the front door body side weatherstrip.
|
|
4. |
Slighty remove the rear door body side weatherstrip.
|
|
5. |
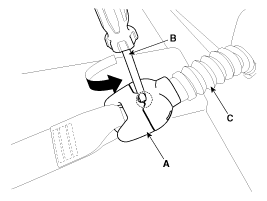
To remove the locking mechanism (A), using a (-) driver (B) turn
it counter clockwise. from the EFD(Emergency Fastening Device) system
(C).
|
|
6. |
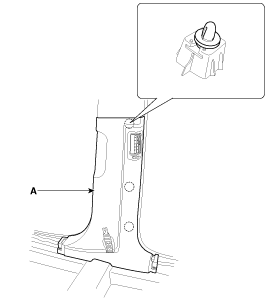
Using a screwdriver or remover, remove the center pillar lower
trim (A).
|
|
7. |
Install in the reverse order of removal.
|
• |
Replace any damaged clips.
|
|
|
[Center pillar upper trim]
| •
|
Put on gloves to protect your hands.
|
|
| •
|
When prying with a flat-tip screwdriver, wrap it with
protective tape, and apply protective tape around the related
parts, to prevent damage.
|
| •
|
Use a plastic panel removal tool to remove interior trim
pieces to protect from marring the surface.
|
| •
|
Take care not to bend or scratch the trim and panels.
|
|
|
1. |
Remove the center pillar lower trim.
|
|
2. |
After loosening the mounting bolt, then remove the center pillar
upper trim (A).
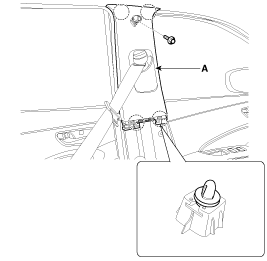
|
|
3. |
Install in the reverse order of removal.
|
• |
Replace any damaged clips.
|
|
|
Component Location 1. Center pillar lower trim 2. Center pillar upper trim ...
Component Location 1. Rear transverse trim ...
See also:
If you have a flat tire while driving
If a tire goes flat while you are driving: 1. Take your foot off the accelerator pedal and let the car slow down while driving straight ahead. Do not apply the brakes immediately or attempt to pull off ...
Components and Components Location
Components 1. Airbag module 2. Bezel 3. Remote control assembly 4. Steering wheel 5. Wiring 6. Lower cover ...
Flex steer
The FLEX STEER controls steering effort as driver's preference or road condition. You can select the desired steering mode by pressing the FLEX STEER button. Type A Type B When the steering mode button ...
 Hyundai Santa Fe: Center Pillar Trim. Repair procedures
 Center Pillar Trim. Components and Components Location
 Rear Transverse Trim. Components and Components Location


