 Hyundai Santa Fe: Inhibitor Switch. Repair procedures
Inspection
|
Power Circuit Inspection
| 1. |
Disconnect the Inhibitor swtich connector.
|
| 2. |
Ignition KEY "ON"" & Engine "OFF".
|
| 3. |
Measure voltge between supplied power and ground at inhibitor
circuit.
|
Signal Circuit Inspection
| 1. |
Connect the Inhibitor switch connector.
|
| 2. |
Ignition KEY "ON" & Engine "OFF".
|
| 3. |
Measure voltages between each terminal and chassis ground during
shift lever changed "P, R, N, D".
Signal Code Table
|
Removal
| 1. |
Set shift lever to "N" position.
|
| 2. |
Remove the air duct.
|
| 3. |
Remove the battery and the battery tray.
|
| 4. |
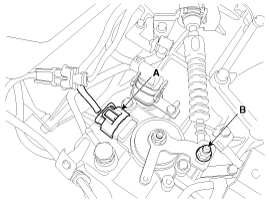
Disconnect the inhibitor switch connector (A).
|
| 5. |
Remove the shift cable mounting nut (B).
|
| 6. |
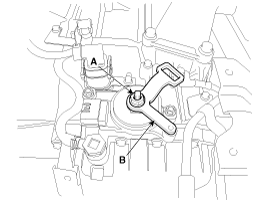
Remove the manual control lever (B) and the washer after removing
a nut (A).
|
| 7. |
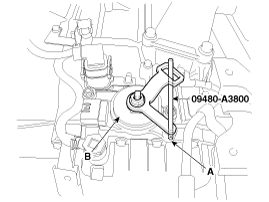
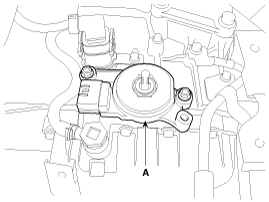
Remove the inhibitor assembly (A) after removing the bolts (2ea).
|
Installation
| 1. |
Install in the reverse order of removal.
|
 Inhibitor Switch. Schematic Diagrams
Circuit Diagram ...
 Shift Lever. Components and Components Location
Components 1. Console upper cover 2. Shift lever assembly 3. Shift cable assembly 4. Shift lever knob & boots assembly 5. Manual control lever 6. Retainer ...
See also:
Recommended cold tire inflation pressures
All tire pressures (including the spare) should be checked when the tires are cold. “Cold Tires” means the vehicle has not been driven for at least three hours or driven less than 1 mile (1.6 km). ...
Door Scuff Trim. Components and Components Location
Component Location 1. Front door scuff trim 2. Rear door scuff trim ...
Tire sidewall labeling
This information identifies and describes the fundamental characteristics of the tire and also provides the tire identification number (TIN) for safety standard certification. The TIN can be used to identify ...
