
 Hyundai Santa Fe: Rear Transverse Trim. Repair procedures
Replacement
|

|
| 1. |
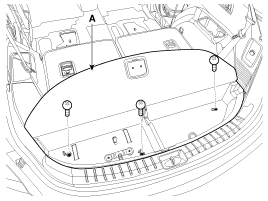
After loosening the mounting screws, then remove the luggage floor
box (A).
|
| 2. |
Using a screwdriver or remover, remove the rear transverse trim
(A).
|

| 3. |
Install in the reverse order of removal.
|
 Rear Transverse Trim. Components and Components Location
Component Location 1. Rear transverse trim ...
 Luggage Side Trim. Components and Components Location
Component Location 1. Luggage side trim ...
See also:
Hood Latch. Components and Components Location
Component Location 1. Hood upper latch assembly 2. Hood lower latch assembly ...
Door Scuff Trim. Repair procedures
Replacement • Put on gloves to protect your hands. • When prying with a flat-tip screwdriver, wrap it with protective tape, and apply protective tape around the related parts, to prevent damage. • ...
Battery recharging
Your vehicle has a maintenance-free, calcium-based battery. If the battery becomes discharged in a short time (because, for example, the headlights or interior lights were left on while the vehicle was ...
