 Hyundai Santa Fe: Tail Gate Latch. Repair procedures
Replacement
|
|
| 1. |
Remove the tail gate trim.
|
| 2. |
Disconnect the tail gate latch connector (A).
|
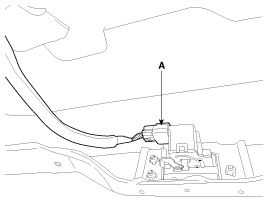
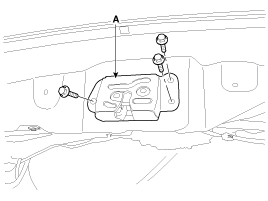
| 3. |
After loosening the mounting bolts, then remove the tail gate
latch assembly (A).
|
| 4. |
Install in the reverse order of removal.
|
 Tail Gate Latch. Components and Components Location
Component Location 1. Tail gate latch assembly ...
 Tail Gate Back Panel. Components and Components Location
Component Location 1. Tail gate back panel ...
See also:
Forward and backward
1. Push the control switch forward or backward to move the seat to the desired position. 2. Release the switch once the seat reaches the desired position. ...
Special Service Tools
Special Service Tools Tools (Number and name) Illustration Use 09431-45100 Oil seal installer Installation of transfer case oil seal. (Right side) 09473-3B100 Oil seal installer Installation of transfer ...
Defroster
CAUTION To prevent damage to the conductors bonded to the inside surface of the rear window, never use sharp instruments or window cleaners containing abrasives to clean the window. ✽ NOTICE If ...
