 Hyundai Santa Fe: Hood Assembly. Repair procedures
Replacement
|
|
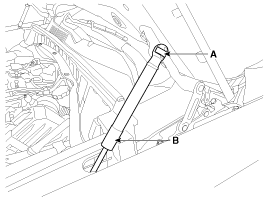
| 1. |
Using a screwdriver, lift the socket clips (A) up slightly on
both ends of the lifter (B).
|
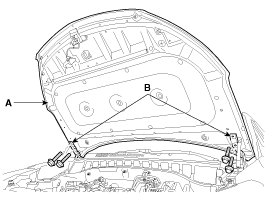
| 2. |
After loosening the hood hinge (B) mounting bolts, remove the
hood assembly (A).
|
| 3. |
Install in the reverse order of removal.
|
 Hood Assembly. Components and Components Location
Component Location 1. Hood assembly ...
 Hood Lift. Repair procedures
Replacement • When removing and installing the hood lifter, an assistant is necessary. • When removing the clips, use a clip remover. 1. Using a screwdriver, lift the socket clips (A) up slightly on ...
See also:
Rear Wheel Speed Sensor. Repair procedures
Removal 4WD only 1. Remove the rear wheel and tire. Tightening torque: 88.3 ~ 107.9 N.m (9.0 ~ 11.0 kgf.m, 65.1 ~ 79.6 lb-ft) 2. Remove the rear wheel speed sensor mounting bolt (A). Tightening torque: ...
Jack and tools
The jack, jack handle, and wheel lug nut wrench are stored in the luggage compartment. Pull up the luggage box cover to find these equipment. (1) Jack handle (2) Jack (3) Wheel lug nut wrench (4) Socket ...
Power Window Motor. Components and
Components Location
Components ...
