Replacement
[Second row seat assembly]
| •
|
Put on gloves to protect your hands.
|
|
| •
|
When prying with a flat-tip screwdriver, wrap it with
protective tape, and apply protective tape around the related
parts, to prevent damage.
|
| •
|
Use a plastic panel removal tool to remove interior trim
pieces to protect from marring the surface.
|
| •
|
Take care not to bend or scratch the trim and panels.
|
|
|
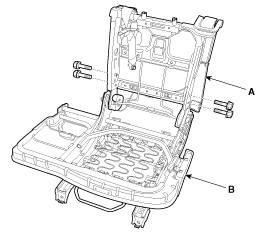
1. |
Remove the rear seat back cover.
|
|
2. |
Remove the rear seat cushion cover.
|
|
3. |
After loosening the mounting bolts, then disconnect the rear seat
back frame assembly (A) and rear seat cushion frame assembly (B).
Tightening torque :
44.1 ~ 53.9 N.m (4.5 ~ 5.5 kgf.m, 32.5 ~ 39.8 lb-ft)
|
|
|
4. |
Install in the reverse order of removal.
|
• |
Replace any damaged clips.
|
|
|
| •
|
Put on gloves to protect your hands.
|
|
| •
|
When prying with a flat-tip screwdriver, wrap it with
protective tape, and apply protective tape around the related
parts, to prevent damage.
|
| •
|
Use a plastic panel removal tool to remove interior trim
pieces to protect from marring the surface.
|
| •
|
Take care not to bend or scratch the trim and panels.
|
|
|
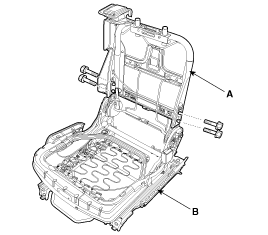
1. |
Remove the rear seat back cover.
|
|
2. |
Remove the rear seat cushion cover.
|
|
3. |
After loosening the mounting bolts, then disconnect the rear seat
back frame assembly (A) and rear seat cushion frame assembly (B).
Tightening torque :
44.1 ~ 53.9 N.m (4.5 ~ 5.5 kgf.m, 32.5 ~ 39.8 lb-ft)
|
|
|
4. |
Install in the reverse order of removal.
|
• |
Replace any damaged clips.
|
|
|
[Third row seat assembly]
| •
|
Put on gloves to protect your hands.
|
|
| •
|
When prying with a flat-tip screwdriver, wrap it with
protective tape, and apply protective tape around the related
parts, to prevent damage.
|
| •
|
Use a plastic panel removal tool to remove interior trim
pieces to protect from marring the surface.
|
| •
|
Take care not to bend or scratch the trim and panels.
|
|
|
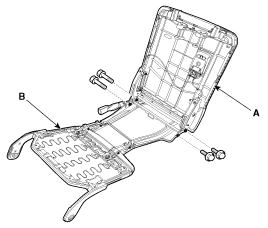
1. |
Remove the rear seat back cover.
|
|
2. |
Remove the rear seat cushion cover.
|
|
3. |
After loosening the mounting bolts, then disconnect the rear seat
back frame assembly (A) and rear seat cushion frame assembly (B).
Tightening torque :
44.1 ~ 53.9 N.m (4.5 ~ 5.5 kgf.m, 32.5 ~ 39.8 lb-ft)
|
|
|
4. |
Install in the reverse order of removal.
|
• |
Replace any damaged clips.
|
|
|
Component Location [Second row seat assembly] (LH) 1. Rear seat back frame assembly 2. Rear seat cushion frame assembly (RH) 1. Rear seat back frame assembly 2. Rear seat cushion frame assembly [Third ...
See also:
Air bag inflation conditions
Front air bags Front air bags are designed to inflate in a frontal collision depending on the intensity, speed or angles of impact of the front collision. ❈ The actual air bags in the vehicle may ...
Schematic Diagrams
Circuit Diagram Connector Pin Information No. Wire harness connector Panorama motor Blind motor 1 Ground 1 Ground 1 Ground 2 2 Glass status signal / Tool fot glass Glass status signal/ Tool (Parameter) ...
Description and Operation
Description Burglar Alarm State [B/A State] B/A State Description DISARM 1. In "DISARM" state, no vehicle start inhibition. So, when door, hood, or Tailgate is opened, there is no alarm sound ...
 Hyundai Santa Fe: Rear Seat Frame Assembly. Repair procedures
 Rear Seat Frame Assembly. Components and Components Location
 Front Seat Belt