 Hyundai Santa Fe: Front Seat Frame Assembly. Repair procedures
Replacement
|
|
| 1. |
Remove the front seat back cover.
|
| 2. |
Remove the front seat cushion cover.
|
| 3. |
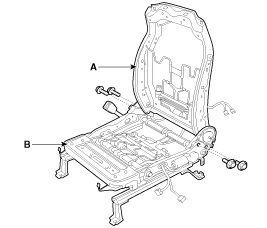
After loosening the mounting bolts, then disconnect the front
seat back frame assembly (A) and front seat cushion frame assembly (B).
|
| 4. |
Install in the reverse order of removal.
|
 Front Seat Frame Assembly. Components and Components Location
Component Location 1. Front seat back frame assembly 2. Front seat cushion frame assembly ...
 Rear Seat
...
See also:
Roof Trim Assembly. Repair procedures
Replacement • Put on gloves to protect your hands. • When prying with a flat-tip screwdriver, wrap it with protective tape, and apply protective tape around the related parts, to prevent damage. • ...
Repair procedures
Adjustment Inspect Glass Alignment 1. Inspect the alignment of the movable glass (C) that is between the front (A) and rear (B) glass and if needed adjust it. Alignment adjustment Standard value [mm(in.)] ...
Lumbar support (for driver’s seat)
The lumbar support can be adjusted by pressing the switch. 1. Press the front portion (1) of the switch to increase support, or the rear portion (2) of the switch, to decrease support. 2. Release the ...
